
Amazon is one of the most popular e-commerce sites in the world, would means the possibility to reach out to millions of potential customers in a single platform. Although updating the quantity of a large number of products, can be a tedious task, it’s an essential part of the listing process for regular sellers. This becomes a bigger headache as the seller’s inventory size grows over time. As Norman Vincent Peale said, “Every problem has in it the seeds of its own solution.”, The answer lies in updating the products by bulk on Amazon using its own template.
Updating Quantity as bulk in Amazon Seller Central can be done in several ways, one is from the Inventory Loader file or Price & Quantity file or using Category Specific inventory file, Here we will discuss the process with Category Specific inventory files using Partial Update features of a flat feed file. To get more details about the Partial Update feature of flat file you can visit here.
Before getting into this article it is advised to use an Excel Spreadsheet to store the product SKUs and the Latest Quantity Number of the products that need to be updated, before starting the process. You can also use free and open-source software like Apache OpenOffice Calc and LibreOffice Calc.
Step 1: Log in to your Amazon seller account and from the top-most menu bar in the dashboard, hover over the “Inventory” & select “Add Products via Upload” from the dropdown menu.

Step 2: Clicking on “Download an Inventory File” will enable you to choose the product category from the Product Classifier section positioned in the Step 1 section. Then, in the Step 2 section where you need to select the type of template, choose the option “Custom”.


Step 3: Selecting the “Custom”, facilitates the users to pick attributes related to the product category selected in the “Product Classifier” section. For the Template type, select “Basic” from the left-hand side “Available Attribute Groups” list and then click on the “Add” button. You will see “Basic” will be on the right-hand side “Selected Attributes Group” area. Then click on “Generate Template” button which will automatically start downloading the template file on the browser.

Step 4: Navigate to where you have downloaded the template file & open it using any Spreadsheet application, i.e. MS Excel, OpenOffice, LibreOffice. In the Template file, you need to fill in the Seller SKU and the Quantity cells according to your products. From the “Basic” column, click the “Update Delete” cell and select the “Partial Update” option for each product. When you have completed editing the template file, save the file as .xls format.

Step 5: Now you need to upload the updated template file. Navigate back to that same Seller Central page where you downloaded that template file and this time click on the “Check and Upload your Inventory File” tab. Select the File Type as “Inventory Files for non-Media Categories”, find and select the saved Excel file from your computer by clicking on the “Choose file” button and then click on the “Check my file” button.

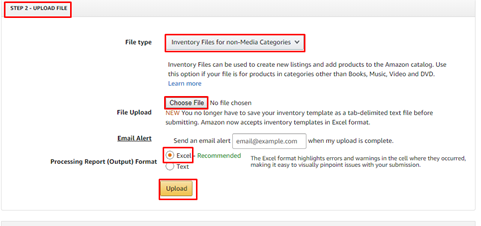
Step 6: After completing the file checking process, you can move on to the option to actually upload the file to the Amazon system. Select the “File Type” as “Inventory Files for non-Media Categories”, choose the same Excel file that you selected on Step 5 of this tutorial by clicking the “Choose File” button and select the “Excel” option on the “Processing Report (Output) Format” section. Finally, click on the “Upload” button.
Usually, after about 15 minutes or more, the inventory & the quantity of the products will be updated. Files that are more than 5MB take around a few hours to be processed & the corresponding products to be updated.
So, there you have it! Following these 6 simple steps will help you to solve that monotonous job at hand of updating each and every product on Amazon one-by-one. Amazon provides instructions and examples on the template file for your reference. After successfully completing the upload you can always check the status of your upload on the “Monitor Upload Status” tab next to the “Check and Upload your inventory File” tab. Last but not least, always keep in mind to strictly follow the attributes in the template file & fill in the required fields to avoid any unnecessary errors.