
Running a Shopify store successfully requires proper branding and product organization. One crucial aspect of this is the vendor name that appears on your product pages. If you’re wondering how to change the vendor name in Shopify, whether for branding, dropshipping, or SEO purposes, this guide will walk you through the process step by step.
Table of Contents
1. Why Change the Vendor Name in Shopify?
2. How to Change Vendor Name in Shopify
3. Common Mistakes to Avoid Changing Vendor Name
4. Benefits of Customizing Vendor Names
5. Final Tips & Best Practices
6. Conclusion
Why Change the Vendor Name in Shopify?
Updating the vendor name is more than just a cosmetic change—it plays a significant role in branding, sales, and customer trust. Here’s why it matters:
1. Strengthen Your Brand Identity
When you import products into Shopify using apps like Oberlo, DSers, or Spocket, the original supplier’s name often appears as the vendor. This can make your store look inconsistent or unprofessional.
Example: If you run a home decor store under “CozyNest,” but the vendor name appears as “ChinaDecor Ltd.,” customers may doubt your credibility. Updating the vendor name to “CozyNest” helps maintain brand consistency.
2. Hide Supplier/Vendor Names in Dropshipping
Dropshipping businesses depend on third-party suppliers for fulfilment. If customers see the original vendor’s name, they might search for the product elsewhere at a lower price.
Example: If you’re selling a smartwatch and the vendor name is “Tech Gadgets Co.,” a customer might Google it and find a cheaper version on AliExpress. Renaming the vendor prevents this from happening.
3. Make Private Label Products Look More Professional
If you sell private-label products, keeping the supplier’s name makes it obvious that you’re reselling. Changing the vendor name enhances the exclusivity of your products.
Example: You sell skincare products and source a moisturizer from “XYZ Beauty Ltd.” Renaming it to “GlowSkin Essentials” makes it appear as part of your unique brand.
4. Improve SEO and Search Rankings
Vendor names are indexed by search engines. If your vendor name is irrelevant or generic, it could negatively impact your store’s SEO. Using a vendor name that includes relevant keywords can boost organic traffic.
Example: If you sell handmade furniture and the vendor is listed as “ABC Imports,” updating it to “RusticWood Creations” increases the chances of ranking higher for “rustic wood furniture.”
How to Change Vendor Name in Shopify
You can change vendor names in two ways: manually for individual products or in bulk for multiple products.
Method 1: Editing Vendor Name for a Single Product
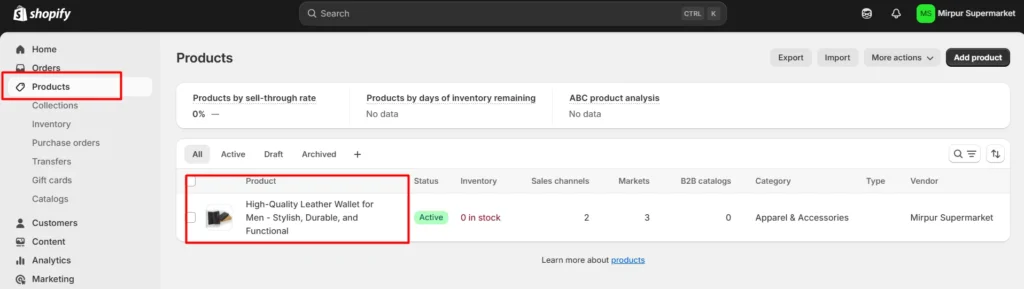
- Log into your Shopify admin panel.
- Click on Products from the left-hand menu.
- Select the product you want to edit.
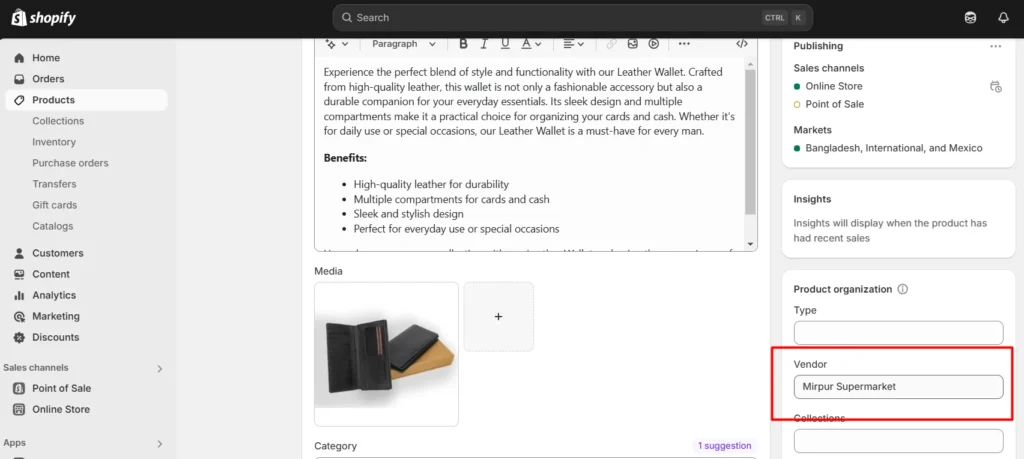
- Find the Product Organization section on the right side.
- Locate the Vendor field and enter the new vendor name.
- Click Save to apply changes.
- Check your product page to confirm the update.

Method 2: Editing Vendor Names in Bulk
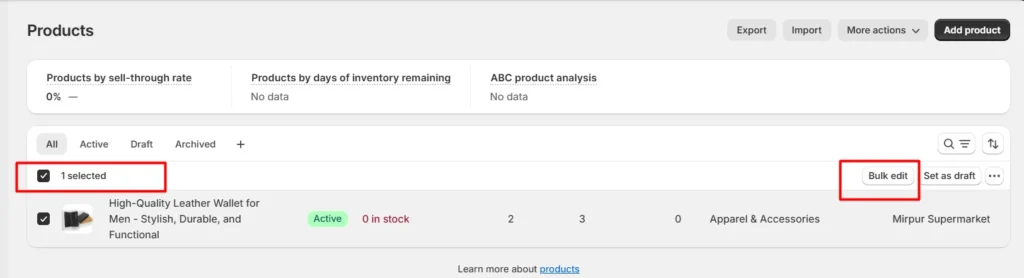
- Go to Products in Shopify admin.
- Select the products you want to update.
- Click Bulk Edit at the top.
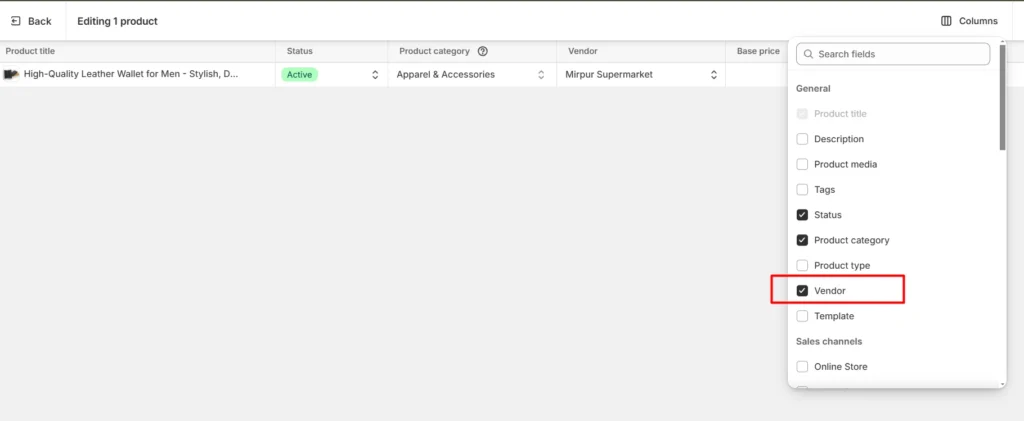
- In the top-right corner, click Columns and select Vendor (deselect other options for easier editing).
- Change the vendor name in the first field, then drag it down to apply to all selected products.
- Click Save to confirm changes.
- Verify updates on your product pages.
Common Mistakes to Avoid
Changing vendor names seems simple, but common errors can affect your store’s performance. Here are mistakes to watch out for:
- Forgetting Bulk Updates: Updating one product but leaving others unchanged can make your store look inconsistent.
- Not Checking Mobile Display: Ensure vendor names appear correctly on both desktop and mobile views.
- Editing Metafields Instead of the Main Vendor Field: Changes in metafields won’t reflect on the storefront unless properly configured.
- Changes Getting Overwritten by Apps: Some inventory or automation apps may revert vendor names to their original form. Regularly check for consistency.
Benefits of Customizing Vendor Names
- Builds Trust & Professionalism – A well-branded store instills confidence in customers.
- Prevents Customers from Buying directly from Suppliers – Helps avoid price competition with manufacturers.
- Enhances SEO & Visibility – Custom vendor names optimized with keywords improve search rankings.
Final Tips & Best Practices
Check Vendor Names Regularly
If you use automated inventory updates, make sure to check vendor names often. Sometimes, automation can cause mistakes like misspellings or formatting issues. Keeping vendor names correct and consistent helps avoid confusion and keeps your store organized.
Use Shopify Apps for Bulk Edits
Updating many products manually can take a lot of time. Apps like Matrixify let you edit multiple products at once, making it faster and easier to update prices, descriptions, and vendor names. These tools help you manage inventory more efficiently and reduce errors.
Test Changes in a Draft Theme First
Before making big updates to your store, try them in a draft theme first. This way, you can check if everything looks right before applying changes to your live store. Testing first helps you catch mistakes and avoid problems for customers.
Conclusion & Next Steps
Changing the vendor name in Shopify is a simple yet powerful way to enhance your brand identity, protect your business, and improve SEO. Whether you edit products individually or in bulk, ensuring consistency across your store will make it more professional and trustworthy.
Try it out today! If you have questions, drop a comment below or email us at info@ecomclips.com for personalized assistance.