HOW TO CREATE CUSTOMIZATION OPTIONS ON SHOPIFY WITH NO PROGRAMMING EXPERIENCE
Let’s pull back the curtain and take aim at a question we hear now and then, “Just how easily customizable is Shopify for general sellers who don’t understand the coding?”
Sometimes you need to let your customers customize a product before checkout on your Shopify store. Maybe you offer a personalized engraving option, or you need to let customers upload a file, or you want to let them choose from other custom options. Definitely, you will face difficulties if you are not a coding nerd. This blog post is the right solution for your problem. Today we will discuss about how to add customization options quickly and easily on Shopify using an app.
There are so many ‘product option’ app there for customization made by well-known names like Bold, Shopstorm, Hulk code etc. We will pick “Bold Product Options” by Bold today.
USING BOLD PRODUCT OPTIONS
If your products have more personalization than allowed by Shopify’s 100-variant limit, you can use this ‘BOLD PRODUCT OPTIONS’ app to get the product customization you’re looking for.
The app doesn’t create additional variants for standard options, allowing your inventory to be kept in check and reducing clutter in your admin.

With Product Options, you can add customizable options to your products such as: file uploads, radio buttons, dropdown boxes, text fields, and much more. We will discuss here about how we can add these features on your product listing page.
BASIC
First, go to your Shopify admin and click on the “Apps” tab.


It’ll show all the apps which you use at times. Find “Product Options by Bold” from the list and click on it. You will find “Create/Edit Options” there, click on that.
It will take you to the ‘Option Sets’ page. Click “Create Option Set” blue button located at the top right-hand corner.

After clicking that, on the next page you will find a blank box named ‘Option Set Name’. Give a name so that you can find this set after months when you need to add another product to this option set.

Then click on the ‘Select Products’ button. You will get a dialog box named ‘Make A Selection’. Click ‘products’ button in the box.

Search the products you want to give the customized options and select one by one. Then click ‘Save Selection’.

Now scroll down and click on ‘Create New Option’ from the same page.

You need to select the option type first. There are so many options in this app, you will find all of them from the drop down button ‘- – Select Option Type – -’.

After completion of this process we can add different types of customization on any products.
HOW TO ADD A REFERENCE LINK BUTTON
Sometimes you need to provide a link for your customer describing your offer types on an image. Let’s have a look on the following image:
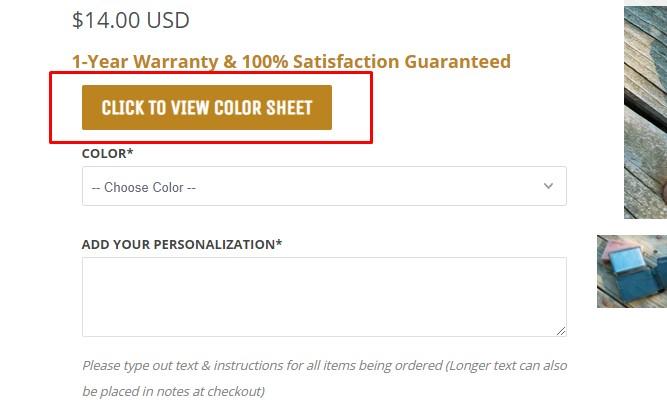
Here, seller added ‘CLICK TO VIEW COLOR SHEET’ button to his product. By clicking this customer will find a dialog box with that ‘color sheet image’. This type of reference button will provide an easier abc of your product to your customer.
To add this button you need to select ‘Descriptive Text’ from ‘- – Select Option Type – -’ dropdown button.

Provide a name and system name for recognizing it after months. Then add the following value to the blank ‘value’ box:
<a class=”button” href=”SHOPIFY IMAGE URL” onclick=”javascript:void window.open(‘SHOPIFY IMAGE URL’,’1510886854645′,’width=700,height=500,toolbar=0,menubar=0,location=0,status=1,scrollbars=1,resizable=1,left=0,top=0′);return false;”>YOUR TEXT</A>
Remember, you need to provide your correct image url twice in the inverted commas (“ ” or ‘ ’) and also text that you want to view on the reference button.
Fill ‘Name’ and ‘System Name’ and ‘Help Text’ box. ‘Help Text’ will be shown as shadowed help text below your paragraph box. Note that, ‘Name’ and ‘System Name’ will not show in the front end.
Click ‘Save’ button to finish the process.
HOW TO ADD A DROPDOWN / CHECKBOX / RADIO BUTTON
Dropdown buttons are the most common tools we usually use for customizing products. Let’s say, you want to sell a jacket with 4 different colors: Black, Gold, Silver and Blue. You need to create a dropdown with these 4 color names like the following picture:

So, for creating this box, we have to select ‘Dropdown’ from ‘- – Select Option Type – -’ dropdown button. ‘Value’ box need to fill up by these 4 colors one by one.
Fill up the ‘Name’ and ‘System Name’ box. ‘Name’ box will show your text on the front end and will be the title of your drop down box. Note that, ‘System Name’ will not show in the front end.

Click ‘Save’ button to finish the process.
If you have applied the process perfectly and able to create you dropdown box successfully, then you already have learnt to create the checkbox and radio buttons also.

Just follow the same steps except choosing ‘dropdown’ from ‘- – Select Option Type – -‘ dropdown button first. Choose ‘Checkbox’/’Radio Buttons’ for creating options what you need for your particular products.
HOW TO ADD A PARAGRAPH BOX FOR YOUR CUSTOMER
Many times customers need to provide you some information that you can’t add specifically in your dropdown/radio button. Say, a customer needs a jacket for gifting purpose. She finds your online shop, selects a personalized jacket and wants to see the name of her husband on the jacket. As a seller, you need to know that specific name from the customer. Paragraph box works here significantly. Here is an example of the paragraph box below:

The paragraph box I added above contains a shadow colored help text as well with the box. Now, if you want to create it using the bold option app, you need to finish the basic process I instructed above. Then select ‘Paragraph Text’ from ‘- – Select Option Type – -’ dropdown button.
Fill ‘Name’ and ‘System Name’ and ‘Help Text’ box. ‘Name’ box will show your text on the front end and will be the title of your paragraph box. ‘Help Text’ will be shown as shadowed help text below your paragraph box. Note that, ‘System Name’ will not show in the front end.

Click ‘Save’ button to finish the process. You got your desired front end!
HOW TO OFFER YOUR CUSTOMER TO UPLOAD THEIR OWN IMAGE
Choose ‘File Upload’ from ‘- – Select Option Type – -’ dropdown button.

Fill the ‘Name’ and ‘System Name’ and ‘Help Text’ box. ‘Name’ box will show your text on the front end and will exist just before the ‘choose file’ button. Now, click ‘Save’ button to finish the process. You will get your desired front end like this:

In recent days, sellers of everything from coffee mugs to t-shirts and even consumer packaged goods are discovering the value of letting customers create their own unique products. The selection of the product’s features, colors and shape generates thoughts concerning how would it feel to own that object.

This emotional attachment can explain why some consumers have a clear preference for product customization. Hence it becomes more important for every seller to know how to give their customers various customization options efficiently and cost-effectively. Using apps like product bold option can be very effective in that case. Hope this article will help you understand the common features of product bold option and use it successfully for your Shopify store.