Ever wondered which small changes to your Amazon listing could make a huge difference in clicks and conversions?
Optimizing your Amazon listings is important to drive traffic and increase sales. But how can you be sure that the changes you make are actually improving your performance on Amazon? The answer lies in A/B testing.
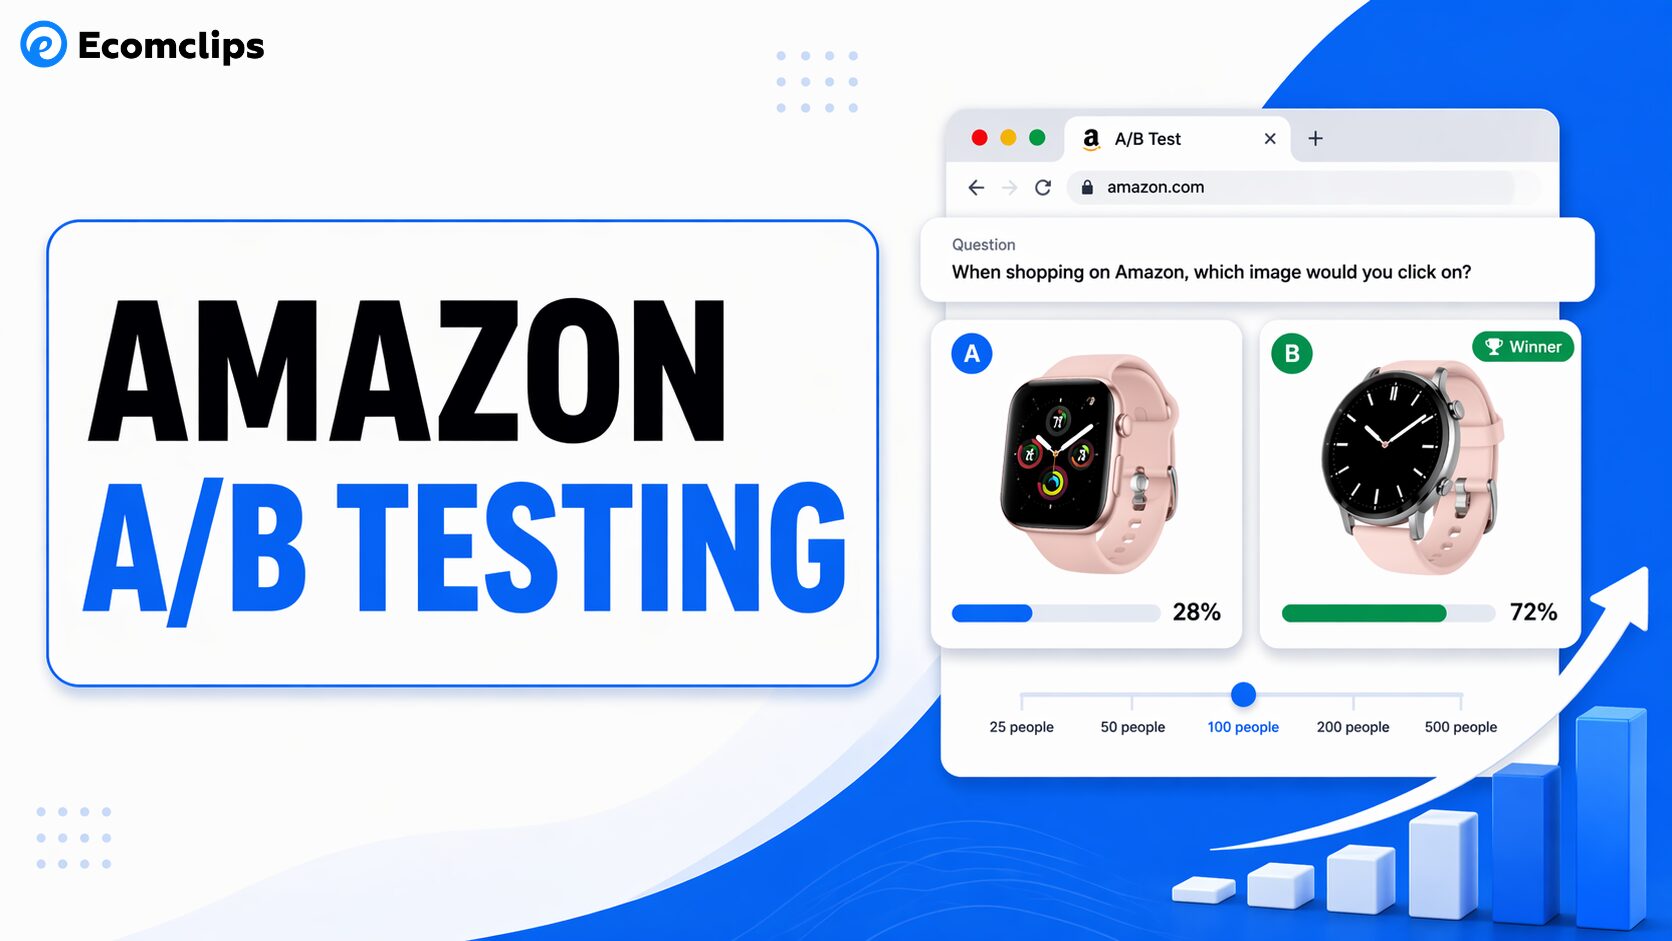
A/B testing allows you to test two different versions of your product listings to identify which one drives more clicks, conversions, and sales. The elements you can A/B test on are your main product image, title, bullet points, A+ content, and price. You can verify by yourself which adjustment leads to more sales and better click rates.
This guide breaks down the essential elements you should A/B test on Amazon and how these small adjustments can lead to better clicks, conversions, and sales for your Amazon business.
What Is A/B Testing?
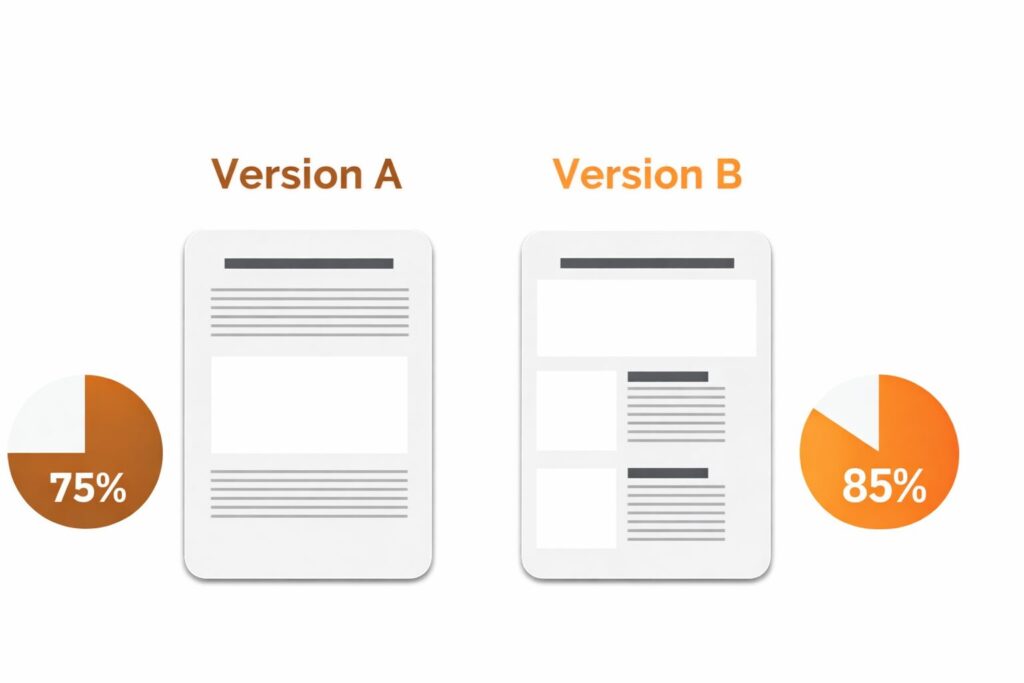
A/B testing, also called split testing, is the process of comparing two versions of the same listing element to see which one performs better.
In simple terms, Version A is the original version, while Version B is the updated version with one clear change. That change could be your main image, title, bullet points, A+ Content, or price.
The goal is to measure which version gets better results for a specific objective, such as more clicks, a higher conversion rate, or stronger sales performance.
Instead of guessing what might work, A/B testing helps sellers make data-backed decisions. It shows which version shoppers respond to better, making listing optimization more accurate, strategic, and profitable.
Why A/B Testing on Amazon Is Important?
Optimizing your Amazon listing can increase sales, but without A/B testing, you are mostly making decisions based on guesswork.
A/B testing helps you understand which changes actually improve performance. Instead of assuming that a new title, image, or bullet point will work better, you can test it and see how shoppers respond. This makes your listing optimization more reliable and much more strategic. You are not just making changes. You are making data-backed improvements that can lead to more clicks, better conversion rates, and stronger sales.
Many successful Amazon brands grow faster because they test consistently. They do not rely only on opinions or assumptions. They look at real customer behavior to see what drives better results.
With A/B testing, sellers can clearly identify what improves:
- Click-through rate
- Conversion rate
- Revenue per visitor
In simple words, A/B testing shows you what your customers prefer. That is why it is such an important part of Amazon’s growth. The more you test and optimize, the better your chances of staying ahead of competitors and improving long-term performance.
How Amazon’s A/B Testing Tool Works?
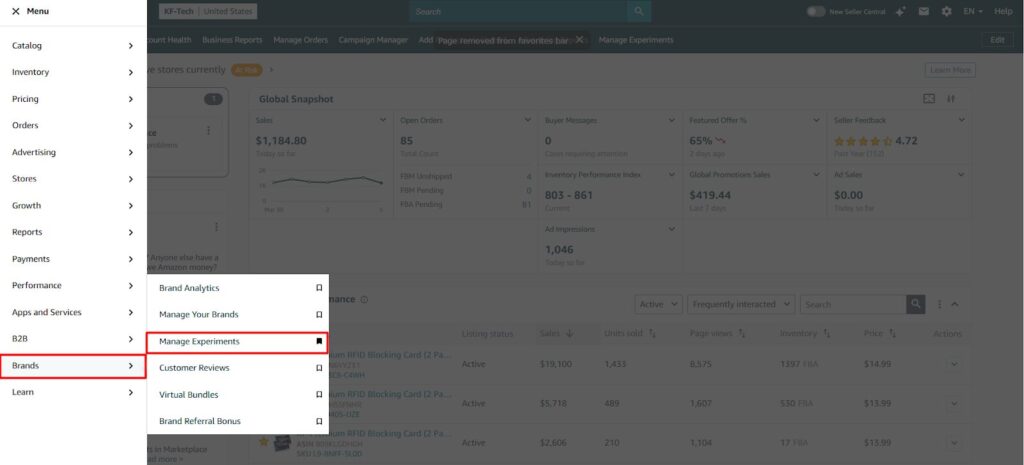
Amazon Brand Registered sellers can use Manage Your Experiments to run controlled A/B tests directly within Seller Central. It is in Seller Central under the Brands menu and is available to sellers enrolled in Brand Registry with a Professional selling account.
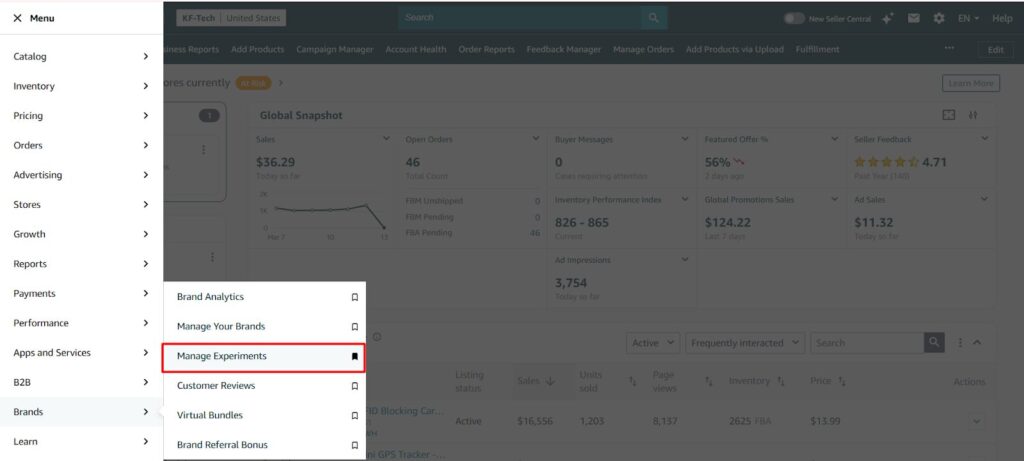
Manage Experiments on Amazon Seller Centre
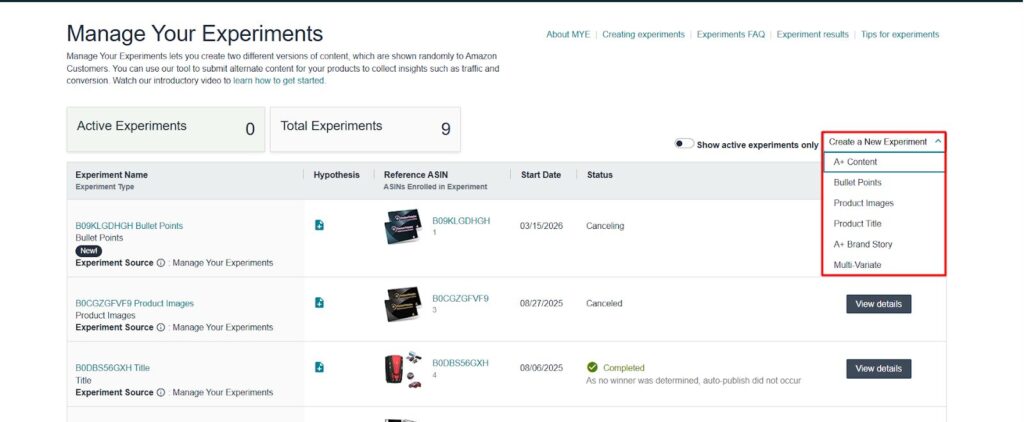
Here is how it works in practice. You create a test by selecting an ASIN and choosing which element you want to test: title, main image, bullet points, description, or A+ content.
A/B Testing Elements
Amazon conducts A/B testing by splitting your incoming traffic randomly. One group sees Version A of your listing, while the other sees Version B. This allows Amazon to compare the performance of both variations simultaneously. After running the test for a sufficient period, usually four to ten weeks, depending on the traffic volume, Amazon analyzes the results and tells you which version outperformed the other.
To help you make a well-informed decision, Amazon also provides a projected 12-month sales impact, which gives you a clear picture of how the revenue from the two versions might differ over time.
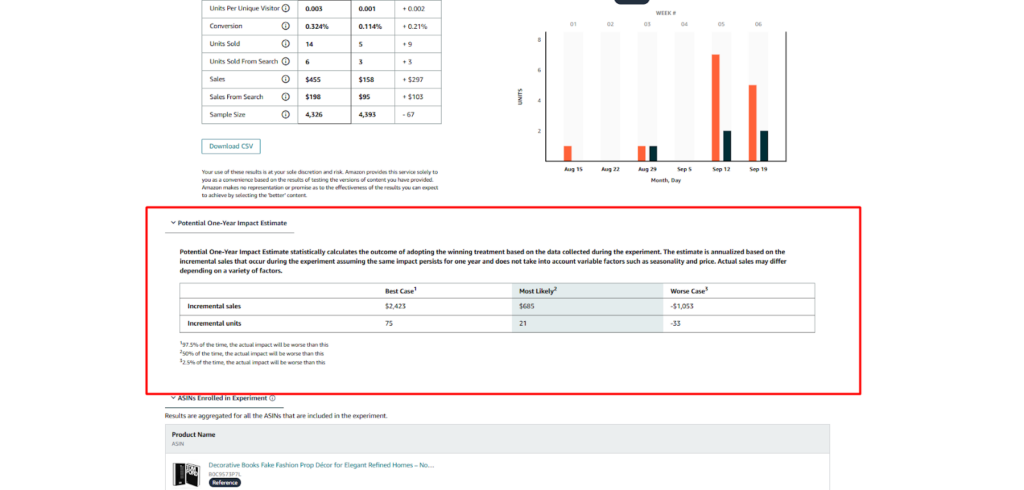
Sales Impact
This allows you to see the actual financial impact of each variation before you decide which one to implement permanently, ensuring you choose the most effective version for long term sales growth.

If you are not yet brand registered, manual A/B testing is still possible. You run Version A for two to four weeks, switch to Version B for the same period, and compare your conversion rate and unit session percentage in Business Reports. It is less precise than MYE because traffic and external factors can vary between the two periods, but it still gives you directional data that is far better than guessing.
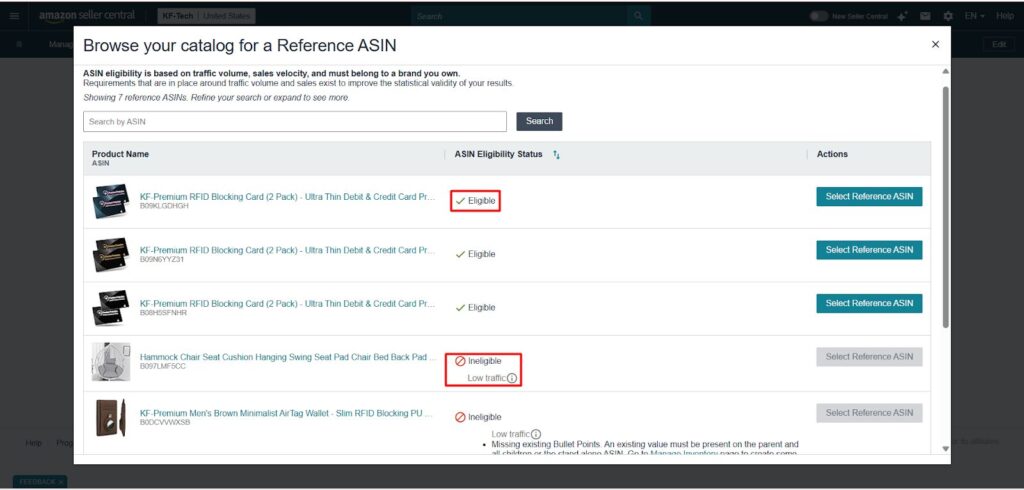
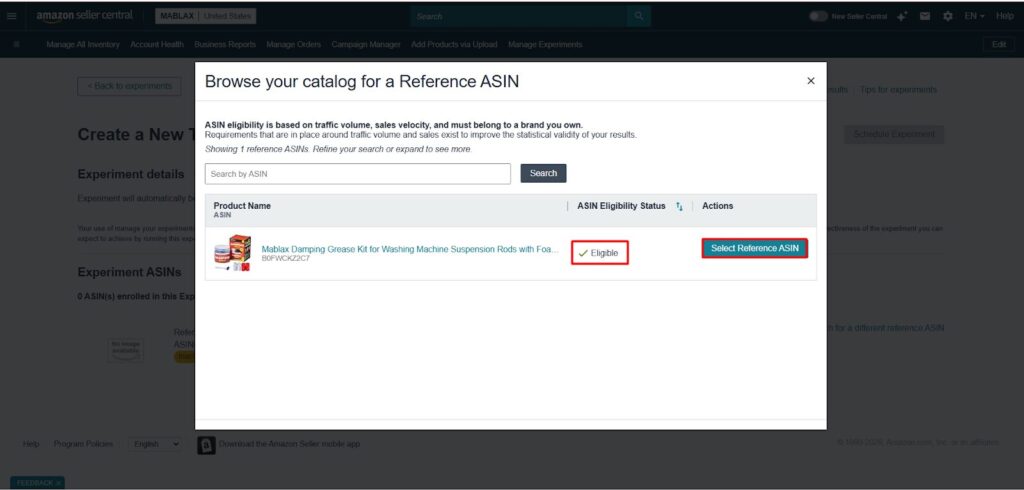
ASIN Eligibility
Eligible ASINs meet Amazon’s requirements for A/B testing, including sufficient traffic and sales volume. Ineligible ASINs are not qualified for testing due to factors like low traffic or missing required data. Low traffic ASINs don’t receive enough visits to generate reliable test results.
The Key Elements to A/B Test on Amazon
Not every listing element has the same impact on your results. Some determine whether shoppers click on your product in search results. Others determine whether they buy once they reach your page.
1. Main Product Image
Your main image is the first thing a customer sees in the search results. It plays an important role in whether someone clicks on your listing. If your main image underperforms, a customer might not visit your product detail page. Testing different main images can significantly improve your click-through rate.
What to test:
- White background vs. colored background
- Different product angles
- Single product vs. product shown with accessories or packaging
- Close-up shots vs. zoomed-out images
- Lifestyle images (product-in-use)
- Adjusting brightness and contrast
Example: Lifestyle images showing the product being used in real life often outperform standard product shots. A well-designed lifestyle image can communicate how the product fits into a shopper’s life, increasing the likelihood of a click.
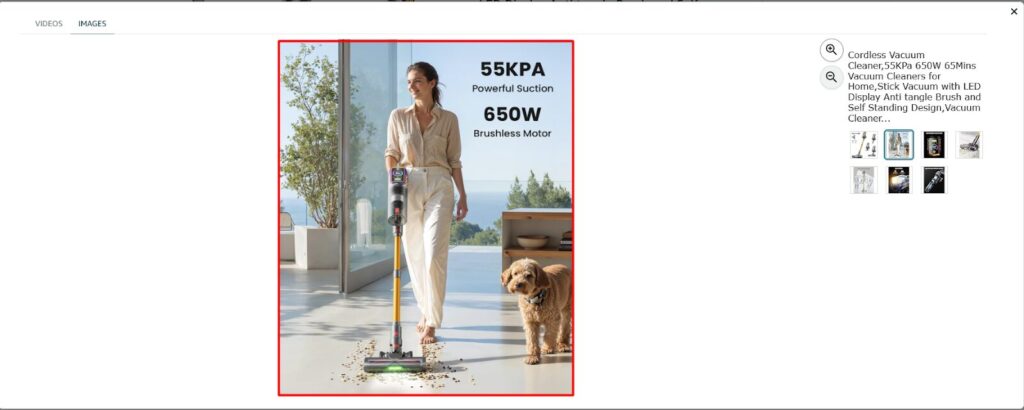
By testing these elements, you can get to know what drives customers to further explore the rest of your product detail page.
2. Product Title
Your product title works in two ways simultaneously. It tells Amazon’s algorithm what your product is, and it tells the shopper whether your product matches what they searched for. A title that clearly does both will perform better than a title that only focuses on keywords or only on customer appeal.
A/B testing different title variations helps identify which version attracts more clicks and improves discoverability.
What to test:
1. Keyword-First Title vs. Benefit-First Title
Keyword-First Title: Vitamin C Serum for Face, 20% Vitamin C, Hyaluronic Acid, Anti-Aging Brightening Serum, Reduces Dark Spots, Fine Lines, Hydrates Skin, 30ml
Benefit-First Title: Brighter, Smoother Skin in Weeks — Vitamin C Serum with Hyaluronic Acid for Hydration & Anti-Aging
Keyword-first titles improve search visibility and benefit-first titles attract more clicks by clearly communicating value to the customer.
2. Including size, quantity, or key specifications
Adding size, quantity, or key specifications in your title helps customers quickly understand the product details and improves conversion clarity.
Without specifications: Men’s Running Shoes, Lightweight Breathable Sneakers
With specifications: Men’s Running Shoes – Lightweight Breathable Athletic Sneakers with Air Cushion Sole, Casual Walking & Gym Trainers, Size 5.5–11 UK
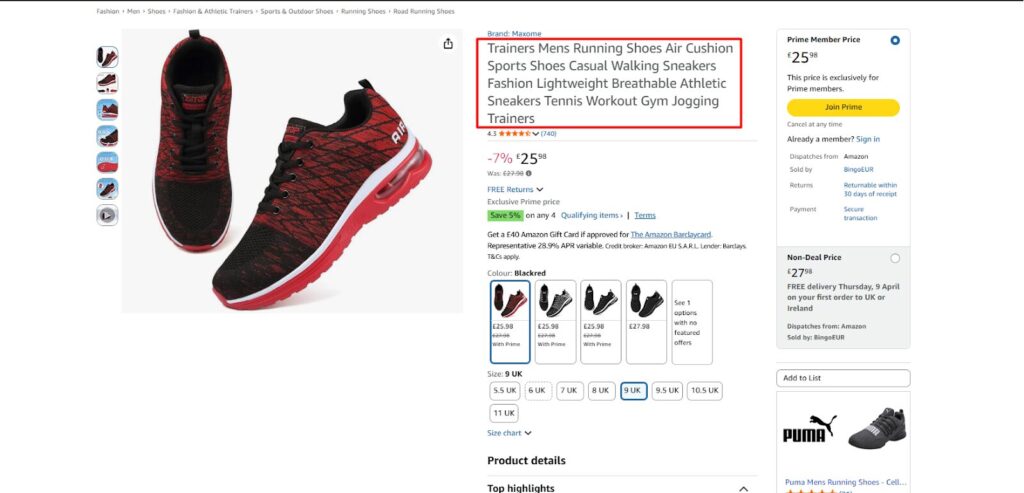
Title with Key Specifications
3. Short titles vs. longer detail-rich titles
Testing short titles vs. longer descriptive titles helps determine which version attracts more clicks and converts better.
Short Punchy Title: Portable Countertop Ice Maker – Fast & Compact
Longer Detail-Rich Title: Countertop Ice Maker Machine with Handle, 26lbs in 24Hrs, 9 Ice Cubes Ready in 6 Mins, Auto-Cleaning Portable Ice Maker with Basket and Scoop, for Home/Kitchen/Camping/RV. (Black)
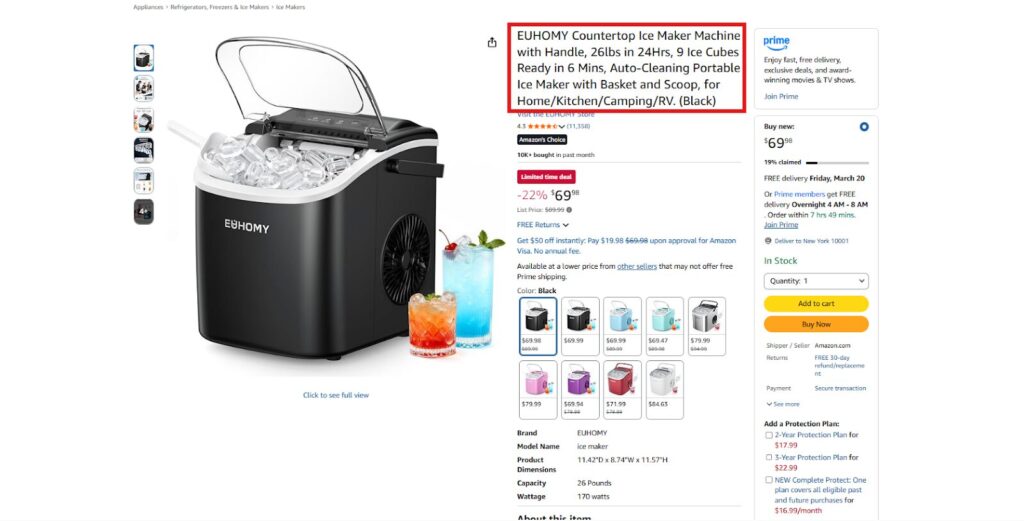
Keyword Rich Title
The short title is simple and easy to read, while the longer title includes more features and keywords that can improve search visibility and help shoppers understand the product quickly. Testing both versions can show which one performs better.
4. Brand Name At The Front Vs. At The End
Another element you can test in your product title is where the brand name appears. Some brands place their name at the beginning to build recognition, while others place it at the end to focus first on the product and its features.
Example: Medicube Toner Pads Zero Pore Pad 2.0 – Dual-Textured Facial Pad for Exfoliation and Pore Care with 4.5% AHA Lactic Acid, 0.45% BHA Salicylic Acid | Ideal for All, Korean Skin Care, 70 Pads (1 Pack)
Brand Name at the End:
Example: Toner Pads Zero Pore Pad 2.0 – Dual-Textured Facial Pad for Exfoliation and Pore Care with 4.5% AHA Lactic Acid, 0.45% BHA Salicylic Acid – Ideal for All, Korean Skin Care, 70 Pads (1 Pack) – Medicube
5. Different Primary Keyword Placement & Phrasing
You can experiment with placing the main keyword at the beginning or toward the end of the title to see which version drives higher clicks and conversions.
If you put the main keyword at the beginning of the title, it quickly tells Amazon and customers what your product is. If you place it at the end, you can highlight the benefits first, which can make the title more appealing.
If you are selling Men’s Airtag Wallet, your primary keyword is Airtag Wallet for Men or Men’s Airtag Wallet.
Example: Airtag Wallet for Men, Men’s Smart Wallet for Air Tag RFID Blocking, Minimalist Bifold Pop Up Aluminum Credit Card Case Holder 12+ Cards with ID Window, Gift for Men, No Airtag Included, Carbon Fiber
Primary Keyword at the End of Title: RFID Blocking Slim Compact Wallet with Money Clip & ID Window, 9-13 Card Holder – Men’s Minimalist Wallet, Aluminum Credit Card Holder Bifold Wallet
Testing both formats can help determine whether leading with the brand name or the product benefits attracts more clicks and conversions.
3. Bullet Points
Bullet points highlight the key benefits and features of your product. Many shoppers quickly scan these sections before deciding whether to purchase.
Some variations to test include:
- Short bullets vs. more detailed explanations
- Benefit-focused vs. feature-focused writing
- Problem-solution structure
- Changing the order of information
- Emotional messaging vs. technical descriptions
- Visual elements (bold headers, emojis)
- Including specific use cases, dimensions, or compatibility details
Bullet points are where many buyers make their final decision to purchase. By this point, the shopper has already clicked on your listing, so your bullet points need to convince them to buy. This is where you should clearly explain the most important benefits of your product, answer common questions, and remove any doubts the customer might have. Strong bullet points help build trust and encourage shoppers to click Add to Cart.
Example: Changing the bullet points to focus on the benefits of the product (e.g., Feel the comfort all day long) can drive higher engagement than just listing features (e.g., Made of 100% cotton).
4. A+ Content
A+ content helps brands tell a stronger story and present product benefits visually. It is where you can tell your brand story, showcase product comparisons, highlight use cases with photography, and address questions that bullet points cannot fully cover.
With A+ Content, conversion rates can increase compared to listings without it. But not all A+ Content performs equally. The layout and the images you choose all affect how shoppers respond.
What to test:
- Layout of A+ content
- Experiment with Main Image
- Lifestyle-heavy layouts vs. feature-callout layouts with infographic-style modules
- Different Orders of Modules (product comparison chart at the top vs. bottom)
- Brand story module at the top vs. further down the page
- Image-led modules vs. text-heavy modules
- Showcasing a single hero use case vs. multiple use cases across different customer types
Testing A+ content layouts can help you identify which version drives the most engagement. For example, a product comparison chart placed at A+ content might immediately answer a shopper’s question, increasing conversions.
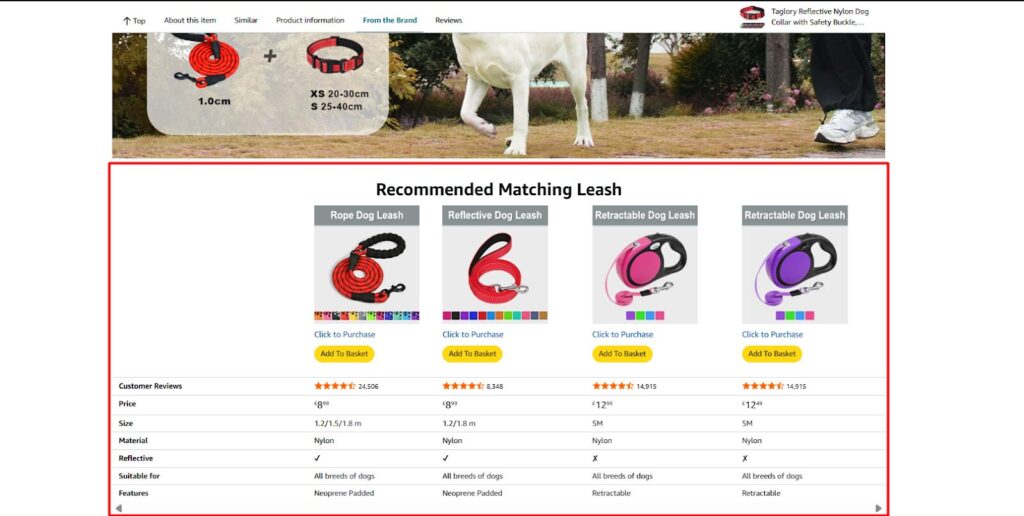
Product Comparison Chart in A+ Content
5. Price
Pricing is a major factor influencing a shopper’s decision. Small price changes can have a significant impact on your click-through rates, best seller ranking, and conversions.
What to test:
- Different price points or bundles
- Promotional offers or coupons
- Price comparison with competitors
What to look for: The relationship between conversion rate and profit per unit. A lower price might convert better but generate less profit per sale. The goal is to find the price point that maximizes total profit, not just total units sold.
6. Secondary Images and Video
While secondary images and video do not appear in search results, they do significant work once a shopper is on your page. They answer visual questions that the main image cannot scale, usage, assembly, texture, comparison, and dimensions.
What to test:
- Order of secondary images
- Infographic-style images with callouts vs. clean lifestyle photography
- Including a product video vs. no video
- “In use” demonstration image vs. close-up detail image
- Packaging or accessories shown together vs. product only
How to Run an A/B Test on Amazon?
Running an A/B test on Amazon is a very simple process that allows you to test different variations of your listings to see which one performs better.
First, go to Seller Center Account and then select Manage Your Experiments in the side menu, found under the Brands section on the toolbar.
1. Select an Element to Test
Next, click on the Create a New Experiment button to begin. Now, choose a specific listing element type you want to run from this drop-down menu. You can test these elements:
- Main Product Image
- Product Title
- Bullet Point
- A+ Content
- Pricing

2. Create Your Variations
Once you’ve identified the element you want to test, select a reference ASIN or an eligible product from your catalog to run the experiment on. It ensures you are testing on a listing that has enough traffic to generate meaningful results.
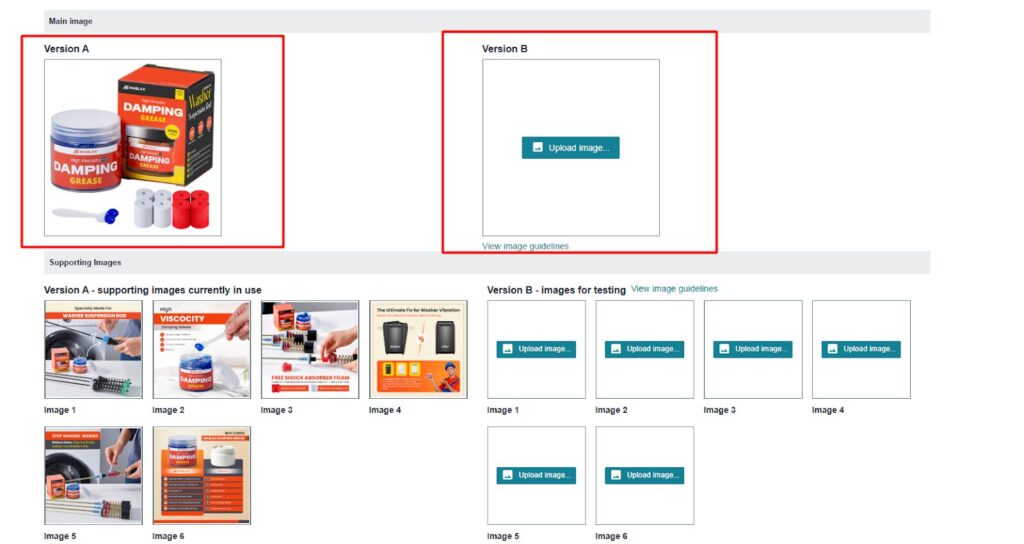
Next, create two variations of that element, Version A (original) and Version B (new). For example, if you’re testing the main product image, Version A could be a standard white background image, while Version B could be a lifestyle image showing the product in real use. This comparison helps you clearly see which version performs better.
Once you’ve selected an element to test, create two variations (Version A and Version B) of that element. For example, if you’re testing the main product image, you might have:
- Version A: The original image with a white background.
- Version B: A lifestyle image showing the product in use.
3. Launch the Experiment
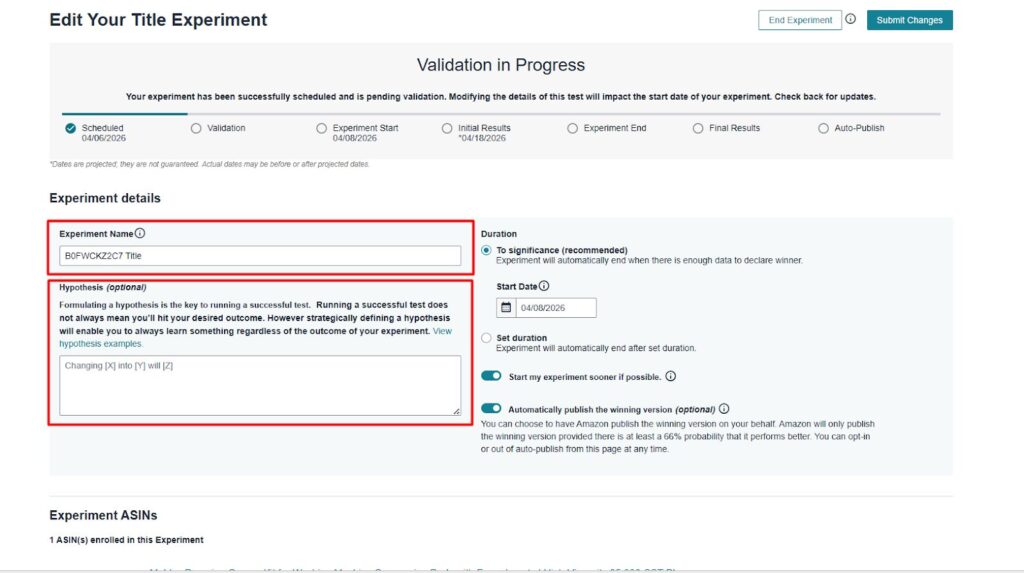
After creating both versions, review the changes carefully and make sure everything is accurate before launching the test. Once confirmed, schedule the experiment through Amazon’s Manage Your Experiments tool.
Amazon will then split traffic between Version A and Version B and begin tracking how each one performs. It allows you to measure important metrics such as click-through rate, conversion rate, and sales performance so you can identify the stronger version based on real shopper behavior.
4. Run the Test for Sufficient Time
Once your experiment is live, allow it to run long enough to collect reliable data. Ending the test too early can lead to inaccurate conclusions and poor decisions.
Amazon typically recommends running A/B tests for 4 to 10 weeks, depending on your product’s traffic. Listings with higher traffic can reach meaningful results faster, while low-traffic products may need more time.
5. Make Your Final Decision
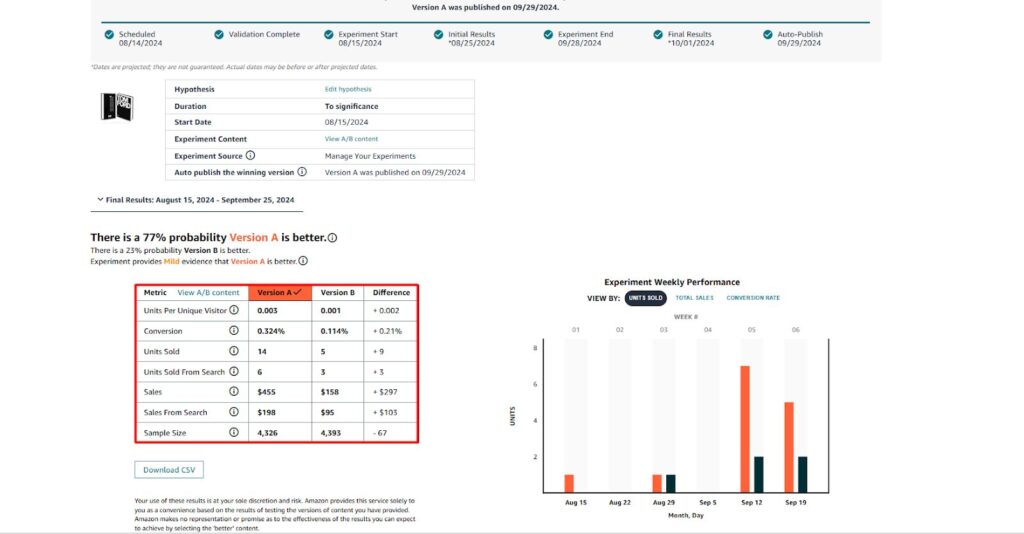
Once the test is complete, review the results carefully to identify which version performed better. Focus on key metrics such as click-through rate, conversion rate, and overall sales performance before making any changes.
If Version B delivers stronger results than Version A, you can apply that version to your live listing and end the experiment. Amazon may also show a projected 12-month sales impact, which can help you understand the long-term value of the winning variation and make a more confident, data-backed decision.
Best Practices for Performing A/B Testing on Amazon
Running a test is simple. Running a test that produces data you can trust takes a bit more discipline.
- Test one element at a time: If you change your title and your main image simultaneously, you will not know which change drove the result. Isolate variables.
- Let the test run long enough: Amazon recommends a minimum of four weeks for most ASINs. Lower-traffic products may need six to ten weeks to reach statistical significance. Ending a test early because one version looks like it is winning is one of the most common testing mistakes, early results are often misleading.
- Use Amazon’s Manage Your Experiments Tool: Amazon’s built-in testing tool helps you run reliable A/B tests. It integrates directly with your listings, tracks key metrics, and ensures statistically valid results.
- Prioritize High-Traffic Listings: Focus your A/B tests on your top-selling products to gather data faster and have a greater impact on your overall sales and conversion rates.
- Make Variations Meaningful: Small, insignificant changes rarely lead to meaningful results. Focus on testing major changes that are noticeable to customers, like price changes, image style, or title structure.
- Do not run tests during atypical periods: Avoid launching new tests immediately before Prime Day, Black Friday, or major holidays. Demand patterns during those periods are abnormal and will skew your data.
- Aim for 95% statistical confidence: Amazon’s MYE tool shows you the confidence level of your results. If confidence is below 90%, the result may not be real, it could be random variance. Wait for more data or accept that this particular test was inconclusive.
- Document everything: Keep a running log of every test, what you tested, when it ran, which version won, and by how much. Over time, this record becomes one of your most valuable listing optimization assets.
What to Prioritize If You Are Just Getting Started
If you are new to A/B testing and are not sure where to begin, start here:
- Start with your main image: It has the highest impact on click-through rate and is the fastest way to see a measurable difference. Even a modest CTR improvement compounds significantly at scale.
- Move to your title next: After clicks are coming in, your title either reinforces or undermines the reason the shopper clicked. A well-structured title keeps them on the page.
- Then tackle bullet points: Once you have clicks and attention, your bullets need to close the sale. This is where conversion rate improvements typically live.
- Tackle A+ Content, Secondary Images, and Price: Once you have optimized the core elements (main image, title, and bullet points), move on to testing A+ Content. Testing different layouts and image-heavy vs. text-heavy content can increase engagement.
Maximize Your Amazon Sales with Strategic A/B Testing
A/B testing on Amazon is one of the most effective ways to optimize Amazon product listings and drive more clicks and conversions. By testing key elements like images, titles, pricing, and A+ content, you can continuously improve your Amazon listings and maximize sales. Implement a structured testing strategy, analyze your results, and make data-driven decisions that keep you ahead of the competition.
If you’re ready to make smarter decisions and boost your Amazon sales, begin A/B testing your listings with these key elements today.
How Ecomclips Helps Sellers Win with Amazon A/B Testing
Running A/B tests on Amazon is not just about changing a title or image. To get meaningful results, you need the right strategy, the right structure, and the right interpretation of the data. That is where Ecomclips helps sellers turn testing into real growth.
Here’s how we support your brand:
- Strategic A/B Testing Planning: We identify which listing elements are most worth testing, including main images, product titles, bullet points, A+ Content, and pricing. Our team helps you focus on high-impact changes that are more likely to improve click-through rate, conversions, and sales.
- Data-Driven Listing Optimization: Ecomclips creates stronger Version A and Version B variations based on customer behavior, keyword strategy, and conversion principles. Instead of random changes, we build test variations that are designed to produce measurable improvements.
- Amazon Listing Analysis Before Testing: Before launching any experiment, we review your current listing performance to understand what may be limiting clicks or conversions.
- High-Converting Content Variations: Our team rewrites titles, bullet points, product descriptions, and A+ Content in ways that are both customer-friendly and SEO-focused.
- Performance Tracking and Result Interpretation: Once the test is live, we help analyze the results properly by looking at conversion rate, click-through rate, and sales impact. This ensures you do not just collect data, but actually use it to make better listing decisions.
- Continuous Testing for Long-Term Growth: The most successful Amazon sellers do not test once and stop. Ecomclips helps brands build an ongoing optimization system, where winning results are applied, new ideas are tested, and listings continue improving over time.
Contact us today at info@ecomclips.com or book an appointment with our e-commerce experts to start selling smarter on both marketplaces.
FAQs About A/B Testing on Amazon
1. Which tools can sellers use to A/B test on Amazon?
Sellers can use Amazon’s Manage Your Experiments Tool, which allows them to A/B test product titles, images, and A+ content. Additionally, third-party tools like Splitly and PickFu can be used to test product variations outside of Amazon’s built-in capabilities.
2. How long should an A/B test run on Amazon?
An A/B test should run for at least 4 to 10 weeks to ensure statistically significant results. The duration depends on traffic volume and product type. Longer tests help capture enough impressions and conversions to make data-driven decisions.
3. What should Amazon sellers test first on their listings?
Sellers should start by testing the most impactful elements, such as the main product image, title, and bullet points. These elements have the biggest influence on click-through rates and conversion rates.
4. How do I determine if my A/B test results are statistically significant?
A/B testing tools, such as Amazon’s Manage Your Experiments, will help you analyze the data and determine the confidence level of the results. Generally, aim for 90–95% confidence to ensure reliable results.
5. Can I A/B test multiple elements at once?
It’s recommended to test one element at a time to understand which specific change led to the performance improvement. Testing multiple elements at once may lead to unclear results and make it difficult to identify what’s driving the change.
6. What are the most important elements to A/B test on Amazon?
Key elements include main product images, product titles, pricing, A+ content, and bullet points. These have the greatest impact on visibility, customer engagement, and conversions.
7. How do I optimize my A/B testing for better results?
Ensure you’re testing meaningful variations, running tests during normal sales periods (avoid sales events), and analyzing traffic data. Focus on high-traffic listings to get quicker, more actionable insights.
Watch our in-depth video guide on Amazon here:
AI-Powered A/B Testing & CRO: Instantly Boost Your Clicks & Conversions #amazon #shopify
Amazon Sponsored Product Retail Ads Tutorial | Run Ads Across Multiple Retailers In 2026
Boost Your Sales Instantly: The Power Of A+ Content On Amazon | Conversion Rate Skyrocketed!
Top 5 Amazon PPC Campaigns You Must Run to Win in 2026
We Rebuilt a Failing Amazon A+ Listing — Here’s What Doubled Conversions
Ecomclips: Your Complete eCommerce Solution Under One Umbrella
At Ecomclips, we bring every eCommerce service you need under one roof — strategy, operations, design, marketing, and growth, all seamlessly connected to help your brand thrive across every marketplace.
Since 2012, we’ve been helping businesses of all sizes launch, scale, and dominate online. From Amazon, Walmart, eBay, and Etsy to Shopify and WooCommerce, our team of marketplace experts, designers, developers, and marketers works together to deliver measurable results.
Our services span the full eCommerce lifecycle:
- Account Setup & Product Listing Management: We handle registrations, compliance, and product data optimization across all marketplaces.
- Amazon Optimization Service: From keyword-rich titles and A+ content to PPC campaigns and storefront design, we craft listings that convert.
- Creative Design & Content Production: A+ visuals, infographics, brand stores, and product videos built to boost engagement.
- Advertising & PPC Management: Smart, data-driven ad strategies for Amazon, Walmart, and Google that maximize ROI.
- Web Development & Store Design: Shopify, WooCommerce, and Magento websites built for performance and conversion.
- Data Management & Automation: Streamlined product feeds, catalog syncing, and inventory control for effortless scalability.
- Customer Service & Order Fulfillment: End-to-end support that enhances customer satisfaction and builds long-term loyalty.
- Analytics & Growth Strategy: Real-time insights and ongoing optimization to ensure consistent, profitable growth.
Whether you’re launching a new store or managing multiple global marketplaces, Ecomclips acts as your single strategic partner, simplifying complexity and driving sustainable revenue growth.