
Tired of your Shopify store looking like every other template out there? Imagine having the power to design unique sections, showcase products your way, and fully control your storefront, all without touching your budget for a developer. Sounds too good to be true? It’s not.
In this guide, we’ll show you exactly how to create a custom section in any Shopify theme in just a few simple steps. Whether you’re working with Dawn, Refresh, or any other theme, this method works seamlessly. You’ll learn how to add personalized layout elements, adjust the design to fit your brand, and keep full creative control over your store’s appearance, all in under 10 minutes.
Why Custom Sections Matter in Shopify
Shopify themes are powerful, but they can be limiting if you don’t know how to code. You might want a custom testimonial layout, a specific promotional banner, or a layout that highlights your best-selling products—yet default themes often don’t offer these exact elements. That’s where creating a custom section comes in. With just a few tweaks, you can build reusable, drag-and-drop sections tailored to your store’s needs and branding.
Why it matters:
- Offers design freedom without needing advanced coding skills
- Helps highlight key offers or features on your storefront
- Lets you build a unique brand presence with reusable components
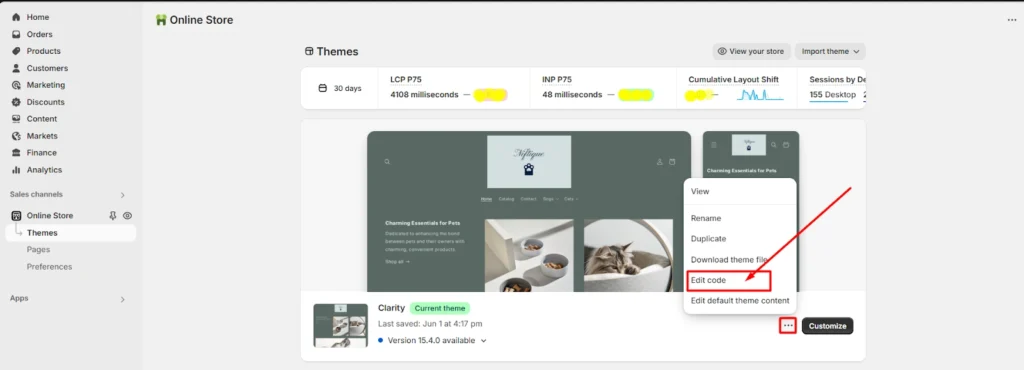
Step 1: Access the Shopify Theme Code Editor
To begin customizing your Shopify store, you need to access the code editor. This might sound intimidating, but it’s actually straightforward. Log into your Shopify admin, navigate to “Online Store,” and click on “Themes.” Once there, hit the three-dot menu beside your active theme and select “Edit code.” This will open up the backend where you can make all your custom changes safely.
Steps to follow:
- Log into Shopify admin
- Go to Online Store > Themes
- Click the three-dot menu > Edit code
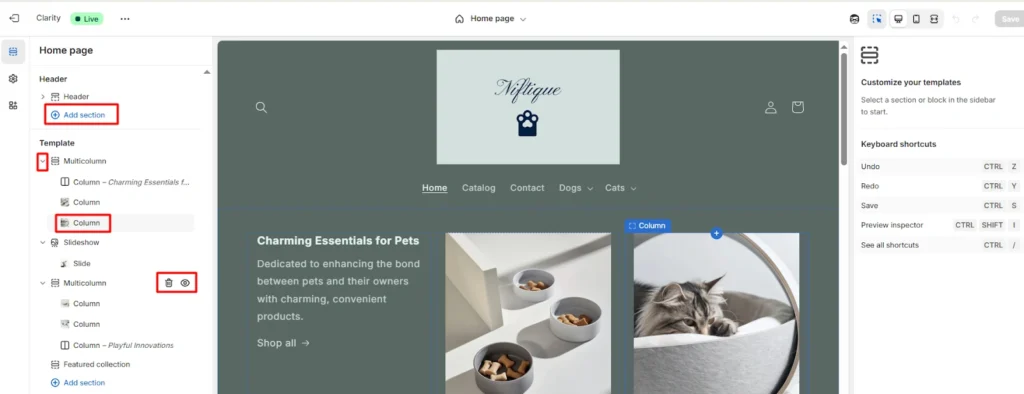
Step 2: Create a New Section in the Code
Once you’re inside the Shopify code editor, navigate to the “Sections” folder. Click “Add a new section” and give it a clear, memorable name — for example, custom-section.liquid. Shopify will automatically generate a basic template for you.
Before diving into the code, take a moment to plan what you want this section to achieve. Are you adding a product showcase, a custom banner, or a promotional block? Having a clear vision will make the customization process faster and more focused. This is also the stage where you can decide whether to keep parts of the default template for structure or start completely fresh. Remember, your section should be both visually appealing and functional, so consider how it will look on desktop and mobile screens.
From here, you have two options:
- Start fresh by clearing out the default code entirely, or
- Use the provided structure as a framework for your customization.
This new section will act as the foundation for your custom layout, so setting it up properly is important.
Pro Tips:
- Choose clear naming conventions so you can easily reuse the section later.
- If starting from scratch, remove all default code for a clean slate.
- Save your changes before previewing to avoid losing progress.

Step 3: Add HTML and Liquid Code
Now that your section file is created, it’s time to bring it to life. Open the new file and start adding your HTML and Liquid code to define the layout. You can go simple with headings, images, and text, or take advantage of Shopify’s dynamic features to display featured products, curated collections, or even blog snippets. The beauty of Liquid is its flexibility — it allows you to create a section that matches your store’s personality and functionality needs.
Before you begin coding, think about the purpose and flow of this section. Will it guide shoppers toward a new collection? Highlight your bestsellers? Share customer reviews? Planning this in advance ensures that your design not only looks appealing but also encourages user action. Consider how each element — from typography to image placement — will work together to create an engaging, conversion-focused space. And always preview your changes to make sure the section looks great on both desktop and mobile devices.
Ideas for What to Include in Your Section:
- Custom headlines and clear calls-to-action (CTAs)
- Featured products or curated collections
- Blog post snippets, testimonials, or reviews
Step 4: Style It with Custom CSS
Adding your section is just the beginning, styling it to match your brand is what makes it stand out. Head over to the “Assets” folder and either edit your existing CSS file or create a new one (e.g., custom.css). Write your custom styling rules there, fonts, colors, spacing, etc. If the CSS isn’t globally applied, you can link it directly inside your section file to ensure a consistent design. This lets you achieve a polished, brand-aligned appearance.
Styling tips:
- Maintain consistency with your store’s brand fonts and colors
- Use CSS classes for reusability
- Add spacing and padding for visual balance
Step 5: Add and Customize the Section in Theme Editor
Now that your section is built and styled, it’s time to use it. Go back to your Shopify dashboard, open the “Online Store,” and click “Customize” next to your active theme. Navigate to the page you want to edit, click “Add section,” and select your newly created section from the list. Drag, drop, and rearrange it as needed. You can tweak the settings directly from the theme editor, making customization fast and visual.
What you can do in the Theme Editor:
- Insert your section into any page layout
- Rearrange blocks with drag-and-drop
- Modify text, images, and links live
The Results: Full Design Control Without Developers
Once your custom section is added, it works just like any built-in Shopify block — reusable, editable through the theme editor, and entirely under your control. This flexibility means you can make design changes quickly, keep your store perfectly aligned with your brand, and experiment with new layouts whenever inspiration strikes.
The real advantage here is the independence it gives you as a store owner. Instead of waiting on developers for every small update, you can test different layouts, swap images, adjust headlines, or change product arrangements in minutes.
This agility lets you respond faster to seasonal trends, promotional campaigns, and customer behavior. Over time, these small, consistent improvements can lead to stronger brand storytelling, higher customer engagement, and a smoother shopping experience that keeps visitors coming back.
Want More Shopify Customization Tips?
If you found this guide helpful, know that it’s just the beginning. At Ecomclips, we specialize in helping Shopify store owners create fully customized, high-performing websites that not only look great but also convert more visitors into loyal customers.
Whether you need custom features, unique design elements, performance optimization, or advanced integrations, our expert development team can bring your vision to life. From building your store from scratch to refining every detail for maximum impact, we make sure your Shopify site works as hard as you do.
📩 Contact us today to see how we can help you build, scale, and optimize your e-commerce brand for long-term success!
📩 Mail Us: info@ecomclips.com
📲 Follow Us for more tips & case studies:
Explore More from Ecomclips