Etsy is one of the most renowned marketplaces around the globe. The platform basically focuses on antique items. Updating inventory on Etsy might actually raise the viewer of your listings. However, Etsy provides no options to upload your products through the spreadsheet into a store. In this case, if we want to upload in Etsy through csv we need to use a tool or extension. In this article, we will illustrate how you can upload variation item on Etsy through CSV file.
first of all, for uploading, we will need EtsCSV. Now the question is
What is EtsCSV?
EtsCSV: EtsCSV is one of the most useful and popular tools for uploading in bulk on Etsy. First of all, in order to use this extension, we need to have an account on Etsy CSV. Basically, there are three business plans in EtsCSV and they are Free, Basic and premium. The following image will illustrate this clearly:
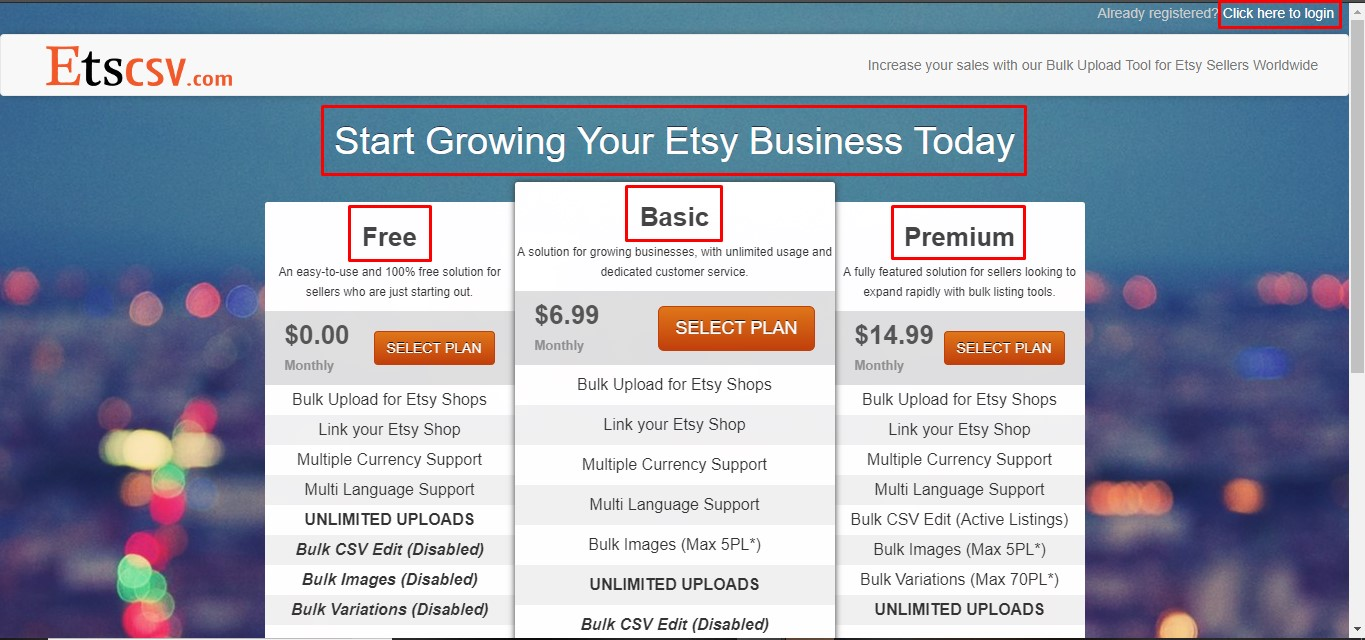
EtsCSV makes it possible for us to effectively perform bulk-uploading of our listings to the Etsy marketplace within only minutes! Whether you are a businessperson or a small seller, EtsCSV is your best choice if you want really a fast, worldwide used uploading tool.
Now, we are set to start the process of
Upload Variation Item on ETSY through CSV file
Step- 1:
First of all, as said before, you need to open an account on EtsCSV.com. Then, log in to this site. After reaching this site you are going to have to download a CSV file. You can download the file from the upper right side.

Step-2:
After downloading the file we have to fill up the column one by one. Before filling up it might be helpful to learn about rules and guidelines for importing listings using variations (multi-variation listing). Primary variation & Secondary variation. Requirements vary depending upon your chosen method of import which could be either basic or advanced.
Please note: We can assign only primary variation values with a price and each variation can have 70 unique options at the most. See Etsy restrictions further down.
Basic Import:
The basic import method treats each row as a unique listing. Entering its variations inline as a comma deli mitered list. For instance, we want to import a listing that has a primary variation of colors. Then a cell within the import file would be used to cater for these values in the following format; red, yellow, black. If you want to take it a step further and apply a price to each you can do so by applying =price to the value within the list.
For example: red=2.50, yellow=1.89, black=1.00
- Header: This is the value you cannot delete. You can insert your SKU/Part number here
- Title: The title can be no more than 140 characters and of course no HTML tags. As long as this string does not match the following pattern, it is valid: /[^\p{L}\p{Nd}\p{P}\p{Sm}\p{Zs}™©®]/u. The characters %, :, & and + can only be used once each.
- Sku: It is the user defined field.
- Listing ID: It is only required if we are updating the existing listings. We need to find the listing ID for our existing listings at Etsy.com
- Description: In order to prevent problems such as descriptions cut off, we should abide by the following rules:
- There should be max 5000 characters.
- Shouldn’t be any HTML tags
- Insert line breaks with
- There should be no symbols (includes microsoft encoded characters such as “ ” ‘ ’).
- Quantity: It is the numeric quantity of an item available for sale.
- Price per item: We should not include the currency symbol. It is set in your Etsy shop.
- Is supply: True or false: 1, 0
- Taxonomy id: It is the numeric ID of the listing’s taxonomy.
- Who made: One of following options is accepted: i_did, collective, someone_else
- Is customizable: True or false: 1, 0
- When made: Accepts one of following options: made_to_order, 2010_2016, 2000_2009, 1997_1999, before_1997, 1990_1996, 1980s, 1970s, 1960s, 1950s, 1940s, 1930s, 1920s, 1910s, 1900s, 1800s, 1700s, before_1700
- Tags: A comma delimited list of tags. For example: decal, graphic, adhesive
- Processing min: The minimum number of days for processing for this listing.
- Processing max: The maximum number of days for processing for this listing.
- Shipping template id: The numeric ID of the shipping template associated with the listing. See shipping template id list at http://etsycsv.com/shipping-templates
- Shop section i: The numeric ID of the shop section for this listing, can be null. See shop section id list at http://etsycsv.com/shops
- Materials: A comma delimited list of materials used in the item. For example: steel, wood, cotton, vynil
- Is private: True or false: 1, 0
- State: Accepts one of following options: active, draft
- Recipient: Accepts one of following options: men, women, unisex_adults, teen_boys, teen_girls, teens, boys, girls, children, baby_boys, baby_girls, babies, birds, cats, dogs, pets
- Occasion: Accepts one of following options: anniversary, baptism, bar_or_bat_mitzvah, birthday, canada_day, chinese_new_year, cinco_de_mayo, confirmation, christmas, day_of_the_dead, easter, eid, engagement, fathers_day, get_well, graduation, halloween, hanukkah, housewarming, kwanzaa, prom, july_4th, mothers_day, new_baby, new_years, quinceanera, retirement, st_patricks_day, sweet_16, sympathy, thanksgiving, valentines, wedding
- Image: Here you can use 5 images; image1, image2, image3image4, image5
- Color>: User defined field
- Size: User defined field
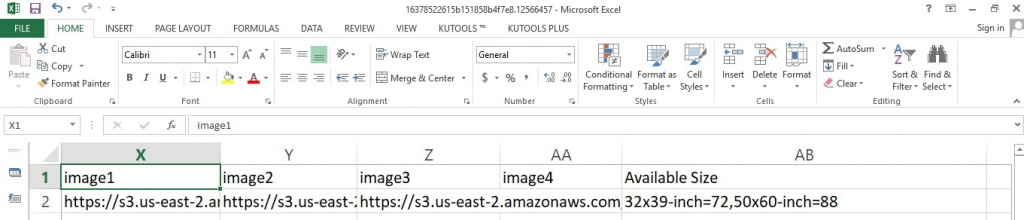
Step- 3:
After downloading the file, fill up the column one by one. Below is an example:


Step-4:
After the fulfillment of the file you need to upload the file. The process is illustrated below:
- During the upload process, please log in your etscsv.com account
- Then select “Shops”.

- Scroll down your mouse and you will see manage import under the page then click on “Manage Imports”.

- Following that, there will be an import new file and you have to click on “Import New File”.

- Select “Choose File” option, browse and select your prepared file and then click upload.

- In the case of variation items, you need to select your “Primary Variation Field”.

- Then click on “Import”.

- After that, you may select 100 items on a page. Then scroll down the page and click “Upload on Etsy”

Thus, we have successfully completed the procedure of How to Upload Variation Item on ETSY through CSV File.


A great piece! Recently I’ve read a similar article telling how to export data records from Etsy to a Google spreadsheet. An interesting fact for me was that the Etsy API supports both CSV and JSON data formats. So, this article includes an example of importing both, as well as configuring automatic data refreshes of the information in Google Sheets https://blog.coupler.io/etsy-to-csv/