
How to Import images on Amazon Vendor Central interface also in bulk using Excel File
Without any doubt we can say that Amazon Vendor Central is all-inclusive podium for suppliers to manage sales and products to hundreds of millions of customers. The Amazon Vendor Central takes the whole process in their hand which starts from buying and storing inventory then ending up shipping and handling. Online selling product’s interface could be confusing but Amazon Vendor Central keeps it clean. Moreover, the dashboard of Amazon Vendor Central has a plethora of tabs including drop-down menus. One can easily get it by just roaming around the interface.
While we were working, we found it a bit challenging to upload the images but anyway collaboration and perfect queries made it easier.

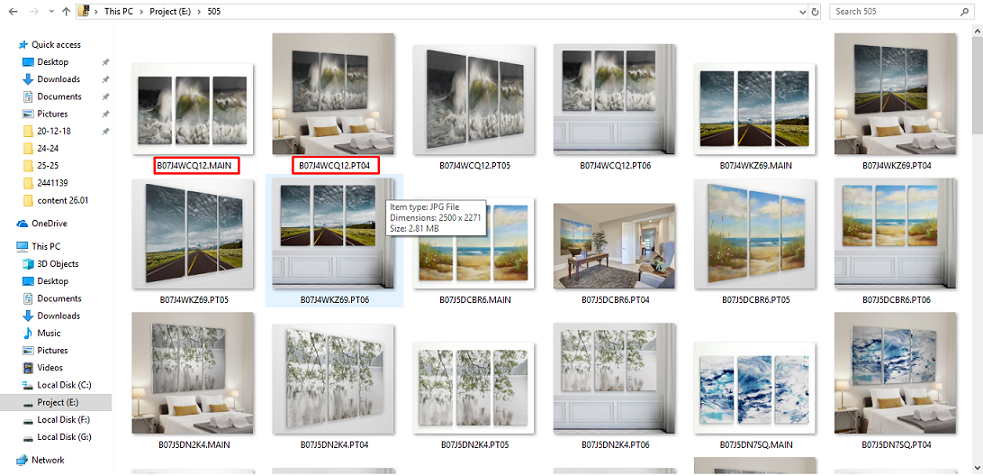
The prior work before uploading the image is to sort out the images according to your SKU and given UPC. This process is done in a particular excel sheet with different height and width and the standard is 1000p x 1000p, otherwise the particular item would be suppressed by Amazon Vendor Central. The next step would be acknowledging the pictures according to items category while Amazon Vendor Central gives separate identical number known as ASIN to direct the product in the items catalog.
The easy and faster way of uploading images in Amazon Vendor Central is using Excel. Because we can review the errors at a time both in images and in the Amazon Vendor Central images setting.
Methods of uploading images of items in Amazon Vendor Central
To initiate the uploading process the excel file should be handy to get the links that contain images of the items. Further, we will observe in the given excel file there are separate column for “Supplier SKU”
and find different SKU’s of items in that column. For example, if we upload 1000 items without images and put images right.

after, then we note the SKU’s of those items and get the image from the “excel file” in to a browsing tab. Normally, we use a site name www.weburlopener.com to open multiple links at a time.

Moreover, we save the images in a given specific product regulation which is “identifier + variant code + file extension” for ‘identifier’ we use ASIN number of particular items. Now, for variant code we use first ‘MAIN’ then PT01 for the 2nd image then 3rd image PT02 it goes on like this. After saving the images we ‘zip’ the file for uploading it for catalogue review.
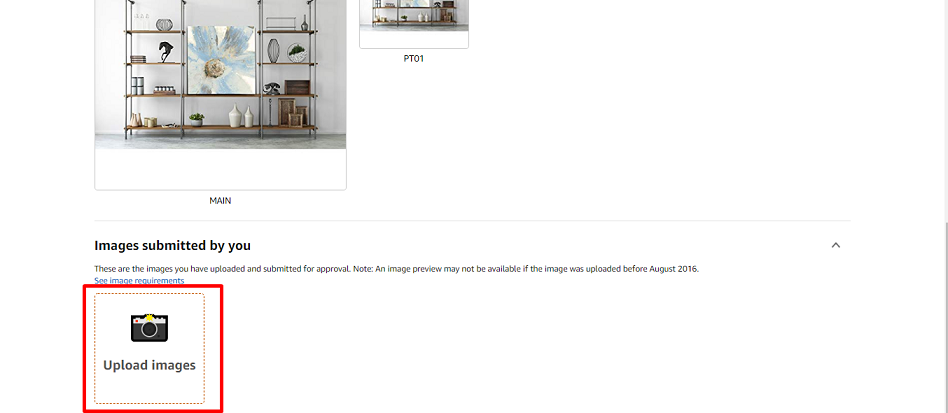
For uploading the images first, we have to click ‘items’ and then ‘Upload Images’ meanwhile we have the ‘zip’ by our side.

After, opening the ‘Upload Images’ page we will see the option “Visit the Previous Version of The Upload Image Page” and select it, since we are uploading a bulk of image.

Next, after entering the page we will see two prime option “choose file” and “Submit” and some instruction manual how to name and format the images we are about to upload. Furthermore, there is a notice that the whole process may take up to two business days. So, after unloading the images we have to check to verify and observe that all image has been accepted because Quality Assurance will make a final decision on the images.

Here, we will select ‘Choose File’ then attach the ‘zip file’ we created before and select the submit button. Slowly but surely Amazon Vendor Central will upload the images and put it on the right ASIN.
Alternative way of uploading
Another way of uploading images is also available in Amazon Vendor Central which is for single product. The process does not take bulk uploads but it can be helpful when one or two products have mistaken images in it. For that, we need to go to “Edit Product” option.

Before doing that, still we have to download items images using the link given in the excel file and save it but without any format or name. Moreover, after entering the edit option we will have to make three choice which are manage image>the little tick mark on the side of the item> Edit product details. Soon a page will appear.

The page will contain the ASIN of the product that we have marked earlier. And there will be option stating the existing images are live at the moment, when ever the images get uploaded in a while it will be also live to review, so they mainly suggest to put the full set of images.

Furthermore, when we start clicking the upload images tab a particular window will open and from there, we can select images to make the particular listing resourceful. The total individual/alternative upload will take a while to adjust the images.
The most important and subject of observance is to have the track od following ASIN or SKU. Because of any case if we lose the track of that then we have to start it again. Although, the images will have a particular folder to rest.
All in all, we can say that Amazon Vendor Central could be a really convenient platform starting from uploading every single item to the end. And we hope after reading this article any confusion regarding uploading images on Amazon vendor central will be eradicated.