
Product listing is the most important and critical factor for any marketplace because without uploading items we won’t be able to generate sales. So, to generate sales you need to list your items first on the marketplaces. Different marketplace and third-party software have some differences for listing products. As a result, most sellers are struggling to add items adequately and flawlessly. In this article, we will guide you on how to list or add items on ecomdash both manually and feed file.
Before showing you the entire process you need to know first about ecomdash software.
What is ecomdash?
ecomdash is one of the most widely used cloud-based order fulfillment and inventory management systems. It provides you with the option to control all of your online sales channels from a single dashboard. With reporting and auto-synchronization, it synchronizes sales and inventory levels across numerous platforms, including eBay, Amazon, Etsy, and more. ecomdash combines common inventory management functions with capabilities for listing management, order management, and shipment management into a single platform. Users can tailor their inventory rules for each channel and automatically sync the inventory levels for all of their channels with ecomdash. The platform transmits and receives data from suppliers, fulfillment facilities, and online sales channels. Additionally, it improves users’ visibility into their retail activities. Also, users can integrate ecomdash with popular eCommerce shopping cart platforms like Magento and Shopify.
Now, let’s deep dive into the process of how to list items on ecomdash manually or through the Feed file.
Add items on ecomdash
On ecomdash, there are 2 ways to upload a product or to list items.
- Manually
- Bulk Upload / Using Feed (CSV file)
Update Individually (Manually)
For doing listings manually, there are 2-ways to list items. They are:
1. Single Product listing
2. Parent Product listing
Single Product listing:
Step 1: First, log in to your ecomdash account and select the All Products option from the Products menu.

Step 2: After that, you will find the Add New option in the top right corner. Please select the Product from the Add New Drop-down menu.
Step 3: On the Add New Product page, you need to add Name, SKU, and tick mark on the Auto Sync box. After finishing this, just click on the Create button for creating a new product.


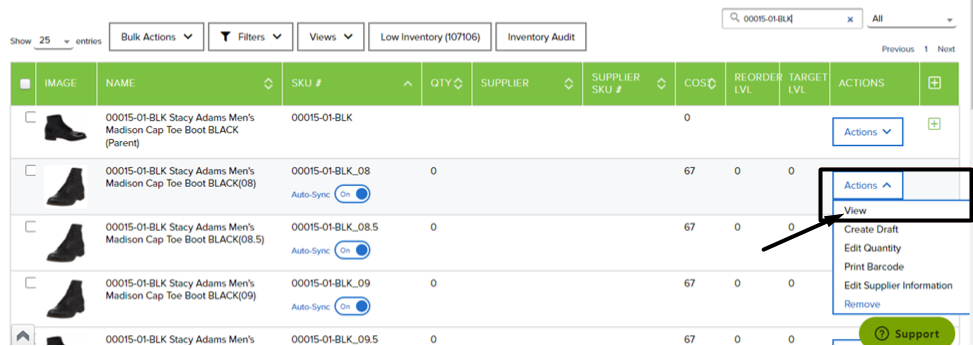
After that, you can also search for your created product in the search bar. Please check the below screenshot as a reference.
Step 4: Now, select Actions > View to add more information on the ecomdash product detail page.
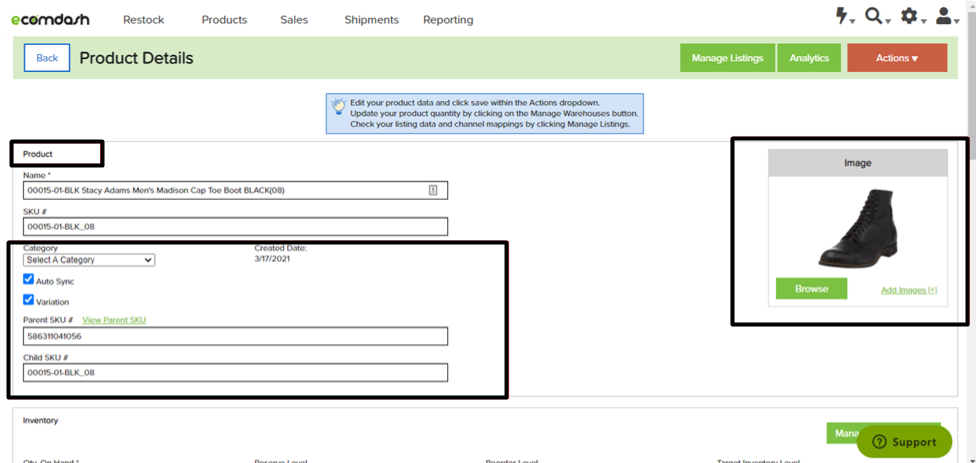
Step 5: On the Product Details page, you can add all the information about your product.

5. a. You can update the category, item name, or SKU. Also, you can add the images and swipe the image position from the image section.
5. b. You can add additional information to this section like supplier, supplier SKU, cost price, Manufacturer name, Manufacturer part number, list price, Brand, UPC, etc.

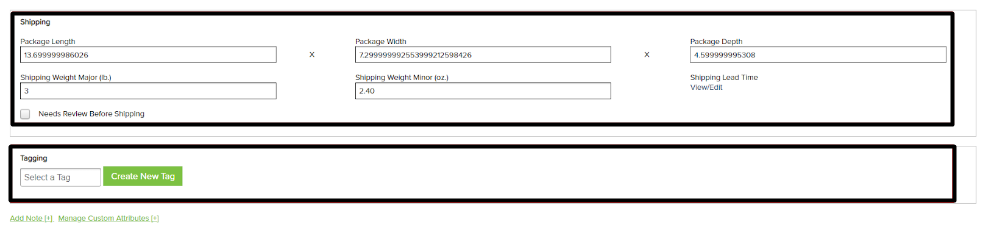
5. c. You can also add shipping information on ecomdash like package length, package width, package depth, etc. You can also add the tags and create the tags on ecomdash.
Step 6: After filling out all the necessary information, select the Save option from the Action menu to save the item on ccomdash.

Parent Product Listing:
Step 1: For the parent product listing, you need to click on the Parent Product from the Add New drop-down option. You will find this Add New button in the top right corner.
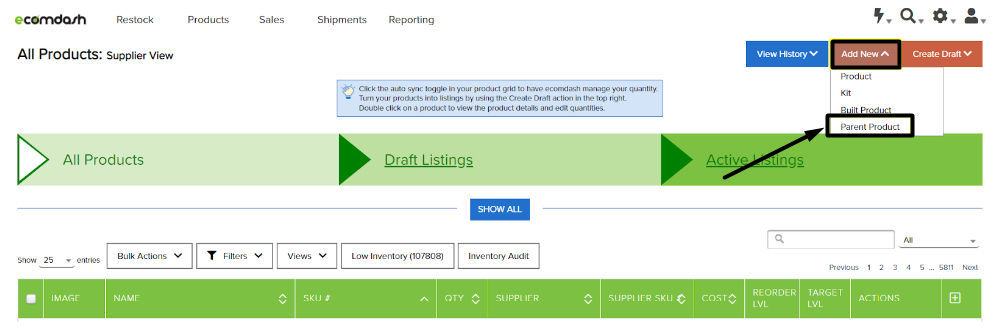
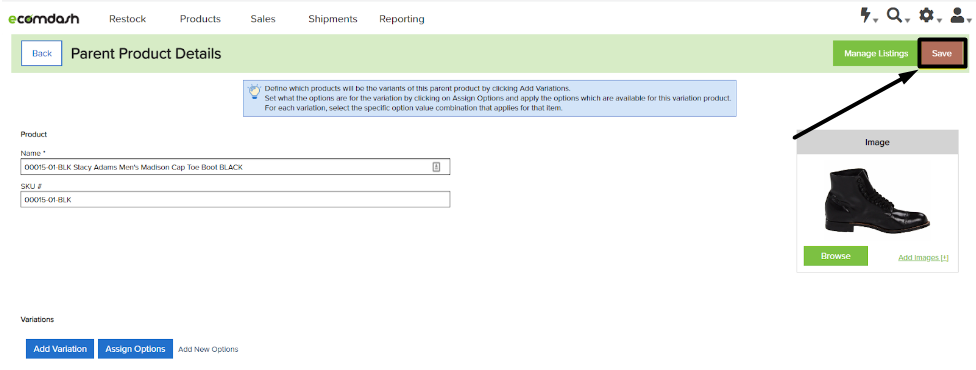
Step 2: To list the parent product on ecomdash, you must add the item Name and SKU#. After providing them just click on the Create button to list the item.
Step 3: After listing the parent product, you can search the item on ecomdash. To add item details, click on the Action and select View from the drop-down.
Step 4: Now, go to the Parent Product Details page and add the Image of your product. You can also swipe the image position and you can add the variation. To add the variation, please click on the Add Variation button.


Step 5: After that, it’ll redirect you to the Add Variation page. On that page, you can search the child SKU through the Search option. For adding your SKU, you just need to select the + sign (you will find it beside the product name).


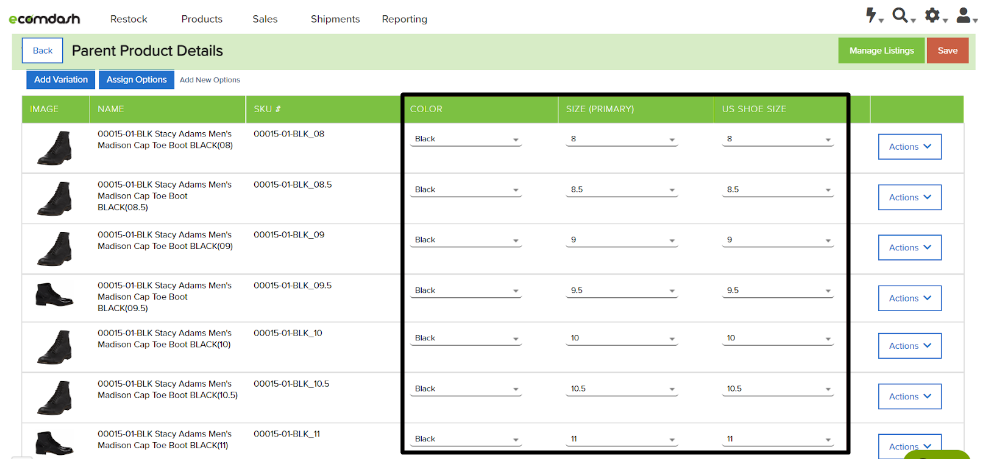
Step 6: After successfully adding your child variation it will again redirect you to the Parent Product Details page. Here you can see all your child’s items. If you want to add size, color, or other variation, click on the Assign Options. When you click on the Assign options a pop-up window will open. Here you need to provide the variation under the Option Sets field. Also, you can create the option from here.
Step 7: Now, you need to provide the value for the variation option according to your product. Click all the drop-down icons and select the value one by one.
Step 8: After filling out all the necessary information, click on the Save button to save the item on ecomdash.

By using Feed (Through a CSV file)
In ecomdash, you can upload or list your new product by building an import format to match your file and uploading a CSV file. By uploading or listing through a feed you can easily upload 1000 or more items at a time. You just need to go through the process of uploading or listing through the feed.
Import Format: On ecomdash, you need to create the format to import any information. To prepare the CSV file, first, you need to create the import format, and using the same format you need to prepare and import the file.
i) To Create Import Format (Single Item):
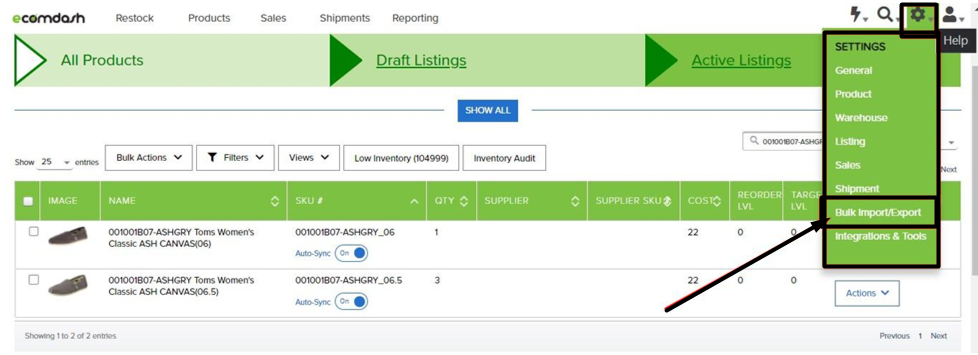
Step 1: Navigate to Setting > Bulk Import/Export.
Step 2: Select Manual Import Formats under the Format Types and click on the View button.
Step 3: Now, click on the Add New option, then input your format or template name and click on the Add New button.
On the Format Details page, you will find Add Attribute option. Click here and add the required attribute like SKU number, Name, and Warehouse Quantity by clicking on the + sign button on the left side of the attributes. Also, you can add more info like supplier, cost price, retail price, brand, UPC, etc.


Step 04: The attributes have been added on ecomdash. Now click on the Save button to save the format.
Now you can find your import format template by the name. Here we have used three templates to upload our product listing.

ii) Bulk Parent Variation Import Format feed file: This is a default parent variation format that is provided by ecomdash. You must need to use the Parent SKU number, Name, and Child SKU Number fields that need to be filled to complete this variation format.
iii) Bulk Variation Attribute Import Format feed file: This is our third feed file where we can define product variation attributes or variation options like size, color, style, etc. This is the default feed that is provided by ecomdash. Here you can add the SKU number, Name, Variation Attribute, and Variation Option field that is required to be filled.

Step 05: To download your prepared or specific format, please select Actions > Get Template

You need to download three formats, one is for Single Item Listing, another one is Bulk Parent Variation Import Format, and the third one is Bulk Variation Attribute Import Format.
Step 6: Here you will see how this template will look when it has been downloaded. Now, you need to complete the files using the required information.
i) Single Item Format:
ii) Bulk Parent Variation Import Format:
iii) Bulk Variation Attribute Import Format:
After completing all the information on the files you need to save the CSV file.
Upload Feed File
Now, we need to upload these files on ecomdash. First, we will upload the Single Item File, then the Bulk Parent Variation Import file, and the Bulk Variation Attribute file. To upload the file, please follow the below steps.
Step 01: Navigate to Actions > Upload Inventory.
Step 02: After that, you need to Browse the correct CSV file from your device that you have prepared to upload the items on ecomdash.

Step 03: Now, select the correct import format for your prepared file from the dropdown. You can check the screenshot below as an example.

Step 04: Please select Perform no action from the drop-down on the 4th option as these are new items on ecomdash. After that, you need to click on the Upload button to upload the file on ecomdash.

Note: Using the same ways to upload all the files on ecomdash.
After completing the upload process you can see the status of your uploaded files. You will see the Complete message when the file is successfully uploaded otherwise you will see incomplete and error messages.

If your file is not uploaded properly then it will be showing Incomplete and you can easily see if the result is unsuccessful. So that you can do the correction by yourself.To sum up, Manually uploading a product or listing is very easy on ecomdash but it’s time-consuming. Because you have to upload every individual item one by one. The manual process is good if you list a few items. But if you want to list a large volume of items then you need to do it using the bulk upload process. We hope that you learn something from this article and are able to list items on ecomdash by following our given instructions. Still, if you have any confusion regarding product listing or ecomdash, no need to hesitate. Just let us know through the comment box. We will be happy to help you with that. If you like our discussion, please comment, share, and subscribe to our blog.