Surely, a conditional discount is another way of dragging visitors into customers. This type of discount is popular in many marketplaces. As Amazon is at the top of the marketplace list, this strategy will work like a bullet on Amazon. Know to learn how to create a conditional discount on Amazon, first, we should have a proper idea for discounts.
Promotions or discounts
Basically, we know that Discounts or Promotions are very powerful tools. It can be really effective for advertising. Every marketplace such as Amazon, eBay, Etsy, Sears, Newegg, Walmart, Alibaba etc. have their own policies regarding discounts.
Competition
Unquestionably, Amazon is one of the most challenging marketplace. Among all the sellers you can become a top seller by engaging the customer to your products. For that, the price is an important factor. The price of your product has to compete with hundreds even thousands of other product prices. If you can attract the customer with your price then to be sure, you have the ability to engage that customer. SO, It is important to realize, creating proper Discount or Promotion strategies for your advertising can be really powerful.

Previously we have shown discounts for one product, coupon code, lightning deals.
Now the question is how you can run the Discount offer on sales of more than 1 items on Amazon. The simple answer will be running a conditional discount! Let’s have a look at what is this process.
Running a conditional discount on Amazon
It means the seller will give you offer like
“Buy 4 items get 20%”
Or “Buy 6 items get 40%” or
Or“Buy 10 items get 50%” etc.
(**Note– If the seller offers “Buy 4 items get 20%” but customer brought more than 5 items or less than 3 items, In that case, the customer will not get the discount. The product price will not be discounted. You have to buy the discountable quantity which is mentioned by seller.**)
Here are the Steps for Running Conditional discount on Amazon
Conditional Discount on Amazon
Step 1:
First of all Go to “Amazon Seller Central”. Generally, Amazon Seller Central is the control panel. This is the place, where every seller on Amazon can control everything and do whatever they want with their product. Here is a screenshot of Amazon Seller Central.

Step 2:
Afterward, go to the “Advertising” section and click to the “Promotions” option.

Step 3:
In order to create any kind of promotion, First you need to select the product. For that, you have to create a selection of the product or a group of products that you want to promote or run discount for. You can do so on the “Manage Production Section”.

Step 4:
Go to the “Product Selection Type” and select the criteria by which you want to select your product. Here are some explanations
SKU List – This list is used if you want to select your product by an SKU list. SKU means “Stock Keeping Units” which a unique identifier for your product. You can use the SKU to identify your product anywhere any time.
ASIN LIST – This list lets you select the products for your discount using the ASINs of the products.
Brand Name List – If you want to select all of your product just select your “Brand” name. Then automatically it will select all of your product.
Then click on “Create Product Selection” Button.
(**Note :For Demo, Here I will choose the SKU list. You can choose any of them as you desire. **)

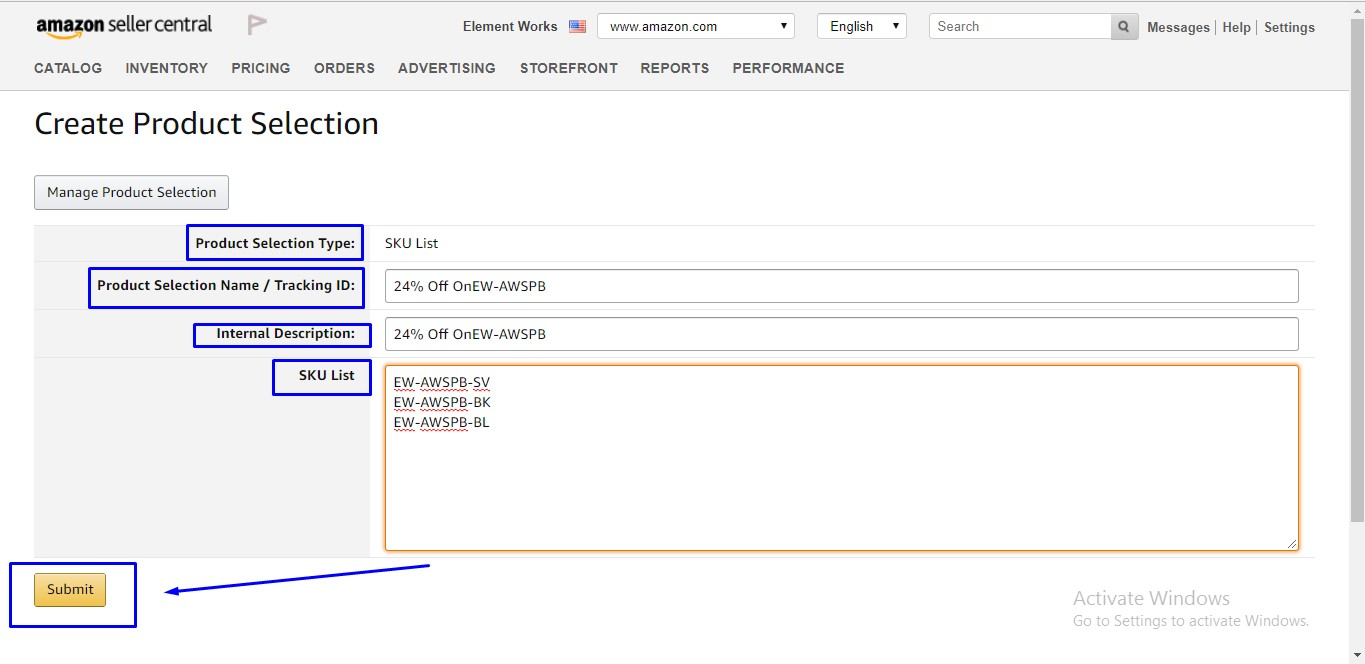
Step 5:
In the “Create Product Selection” there are 4 boxes. To complete this process you have to fill up 3 of them as follows.
Product Selection Type: By default it will be shown as what you selected previously.
Product Selection Name / Tracking ID: This information is for your tracking purposes.
Internal Description: This is for your own understanding. (the description for this product list will not be displayed to customers.)
SKU List:
This is where you provide SKU’s of all the products that you want to run the discount from. Do not put any sku’s that you do not want to provide a discount for. After filling up all the information it should look like this. After this click “Submit” to finish this step.
Step 6:
After submitting, then you can see your all given information here.

Step 7:
Then go to the “Create a Promotion” section. Here you can find many ways to promote your products. For example, Free Shipping, Percentage Off, Buy One Get One, Giveaway & External Benefits. But this article is about Conditional Discount. So we will choose Percentage. To start creating the promotion lets click “Create” button.

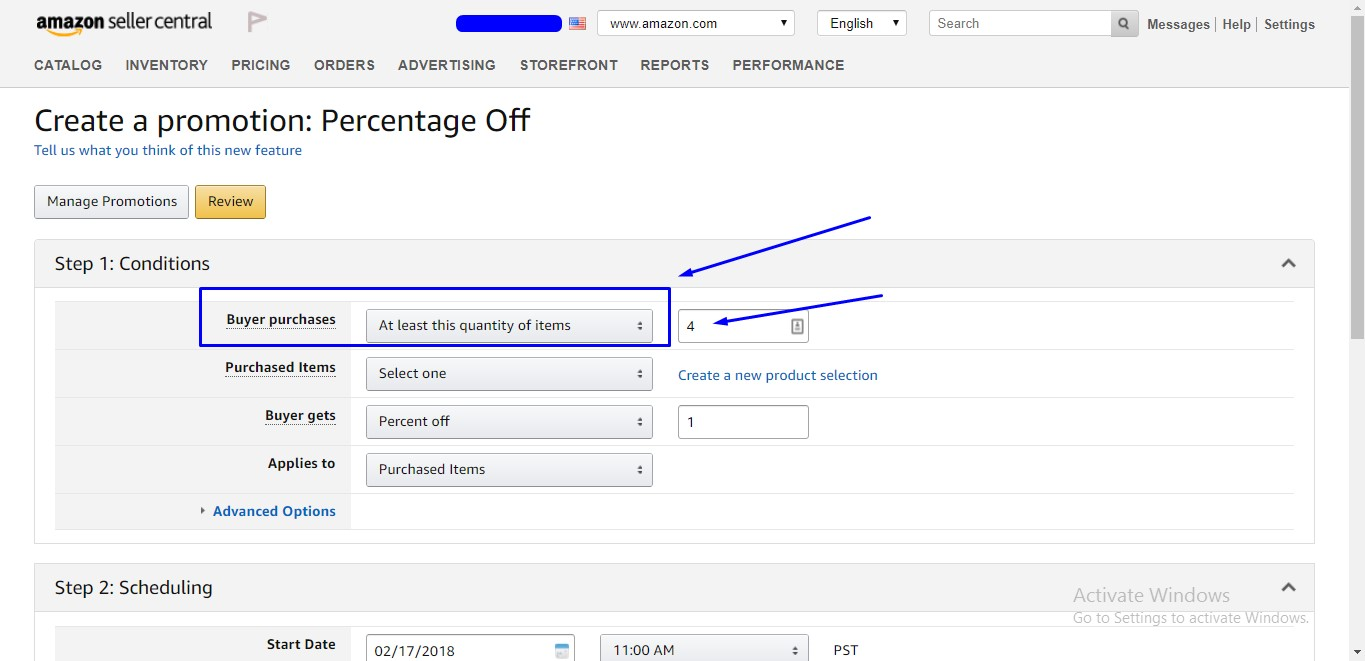
Step 8:
This is where we create the promotion. There are three substeps in this Step.
1) Conditions.
2) Scheduling.
3) Additional Options.
In the Conditions step, on the “Buyer Purchases” section, write your desired quantity that you won’t give the discount for. Suppose if you want to offer “Buy 4 items get 20% off” then the quantity here should be 4.
Step 9:
In the “Purchased Items” section, Search for the selection that you created earlier in “Manage Product Selection” and select that. ( Here we had created “24% Off OnEW-AWSPB”. So we will select that).
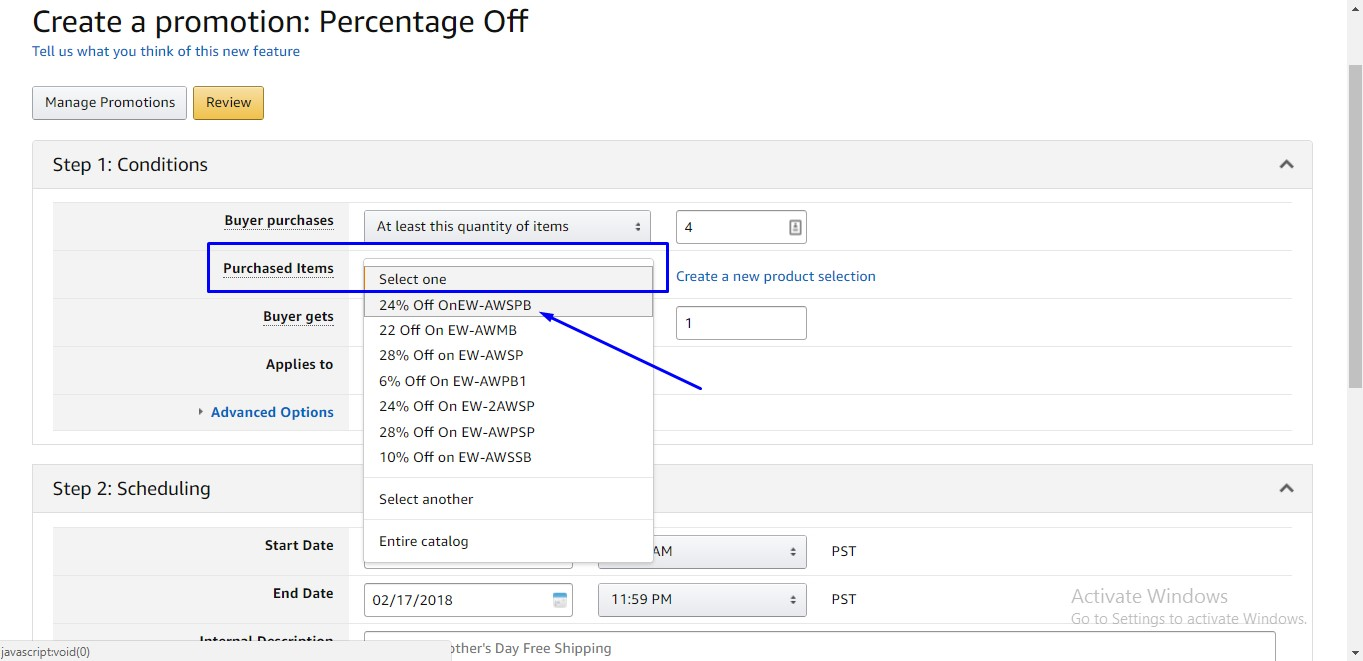
(** Note – If you want to create a “Product Selection” now and have not done it before then you can do so by clicking “Create a new product selection” option & follow from the Step 4. **)
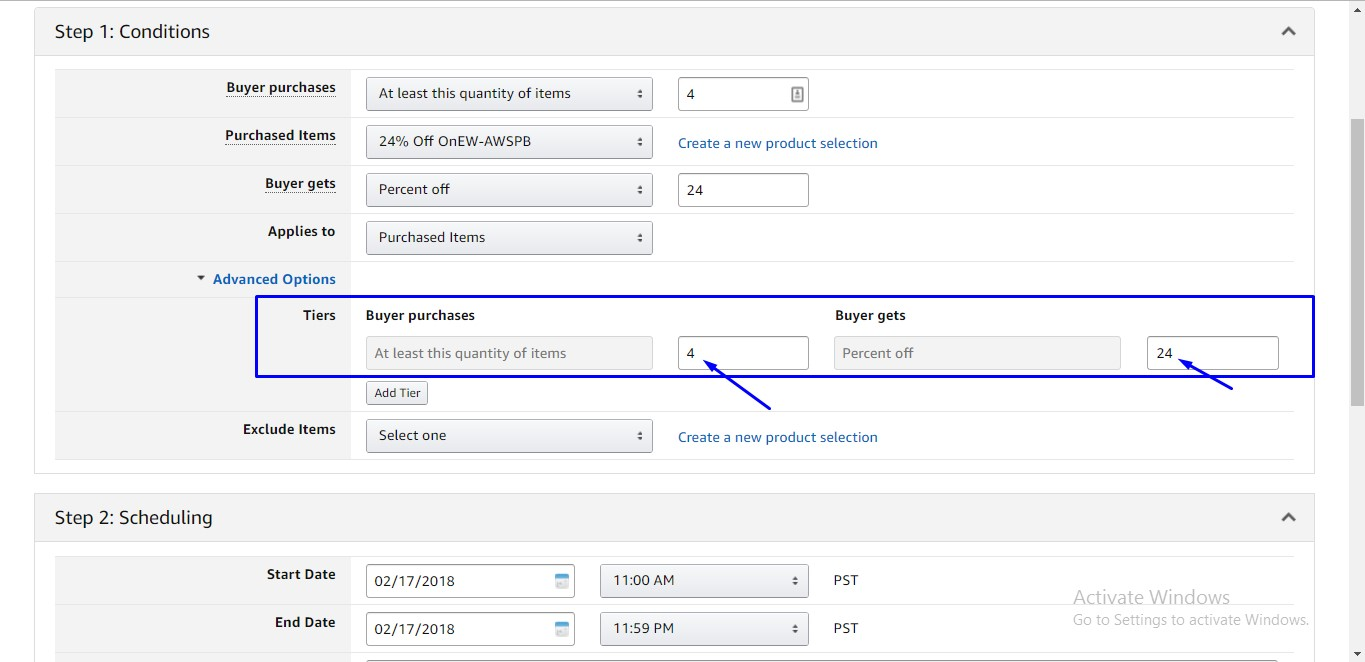
Step 10:
Then in the “Buyer gets” section write you the percentage that you want to discount. It can be whatever you want.
Other option will remain the same.

Step 11:
There is an important section named “Advanced Options”. Normally, if a customer bought 5 items or 6 items or higher items, In that case, the customer will not get the discount. The product price will remain non discounted. For that reason, you can raise your offer items. To do this click “Advanced Options” & then fill up the first Tier.
(** Note – First Tier of information will be the same as we filled up before in the “Buyer Purchases” & “Buyer gets” section **)
Step 12:
To click “Add Tier” button then another tier will be created. You can create again to create a 3rd tier and you can keep going like that. By this, you can provide better discounts for higher purchases.

Step 13:
If you do not want all the items on your “Product Selection” to have the conditional discount offer then you can exclude particular Item(s). You can select an entire “Product selection” list that you want to exclude.

Step 14:
In the “Scheduling” section, you will provide the Start time and the finish time of your desired Conditional Discount. You need to provide the dates from when you want to start running this discount and the date when you want to end it. To provide a date as you see fit.

Step 15:
The “Internal Description” section is for your own understanding. And the “Tracking ID” information will be automatically filled up by default. Third Step “Additional Options” is not needed for our current purpose. After completing all the steps click “Review”.

Step 16:
After clicking “Review” you will see a new window called “Review Promotion” where you can revision all information that you just provided. This is just for your double check purpose. If you find any wrong information then click “back” to go back and fix it. If all the information is ok, then Click “Submit” to finish the process.
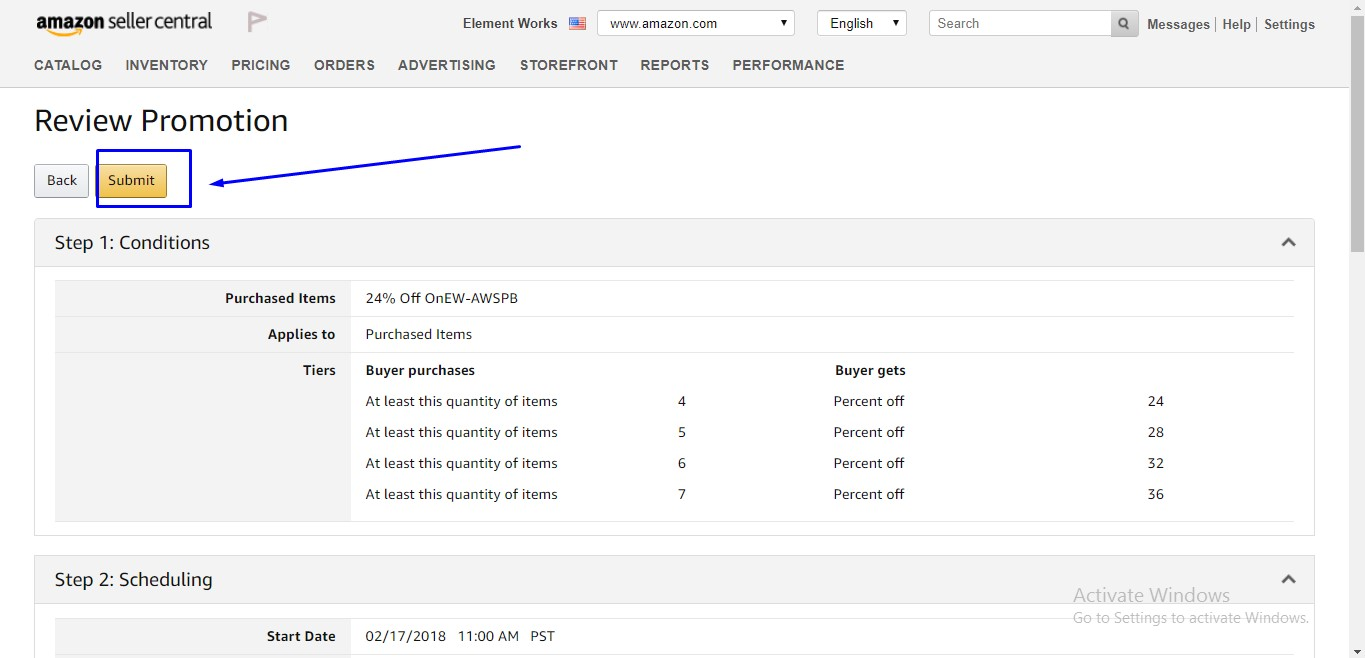
After clicking the “Submit” button a notification will appear that your discount is successfully created.
(**Note – Whatever you choose as your discount start time, the promotion will be activated after 4 hours. **)
Now try yourself
That’s the most updated system for setting up a conditional discount on Amazon. Undeniably this is the best way you can boost up your selling rate. Also, It can come very handy for the clearance of your stock items. A well put the conditional discount at the right time and the right season can make sure you are staying ahead of that scary competition. So, without wasting any time, use this feature and be in the top among your competitor. Feel free to contact us, if you have any queries. Lastly, Let us know your thought in the comment box below.