
Would you like to explore the vast world of Wayfair, the well-known hub for chic furniture, home embellishments, and one-of-a-kind accessories? If you’re a seller, the journey of listing your items on this platform may initially appear a bit intricate. But don’t worry; we’re here to assist you in navigating this process and guaranteeing flawless product listings. Whether you’re just starting out or a seasoned seller seeking a quick update, this guide is essential reading.
Unlocking Opportunities with Wayfair
Wayfair offers a thriving marketplace where sellers can showcase their products to a vast audience of home enthusiasts. The platform’s user-friendly interface and extensive customer base make it an attractive option for sellers looking to expand their reach and boost sales. In this blog, we’ll explore one of the most efficient ways to list your items on Wayfair: using a feed file.

Why Choose Feed file Listing
Before we delve into the details of feedfile listing, it’s important to note that there are two primary methods for listing products on Wayfair: manual listing and feed file listing. While manual listing is suitable for individual items, feedfile listing shines when you have multiple items to list efficiently. This blog focuses on the feedfile process, ensuring you get the most out of Wayfair’s features.
Getting Started with Feed File Listing
Let’s jump right into the process of listing your products through a feed file on Wayfair. We’ll keep things beginner-friendly while highlighting the essential steps. Log in to Your Wayfair Partner Account: Start by logging in to your Wayfair partner account.

Access Product Management
From the Product Management option, click on “Add New Products.”
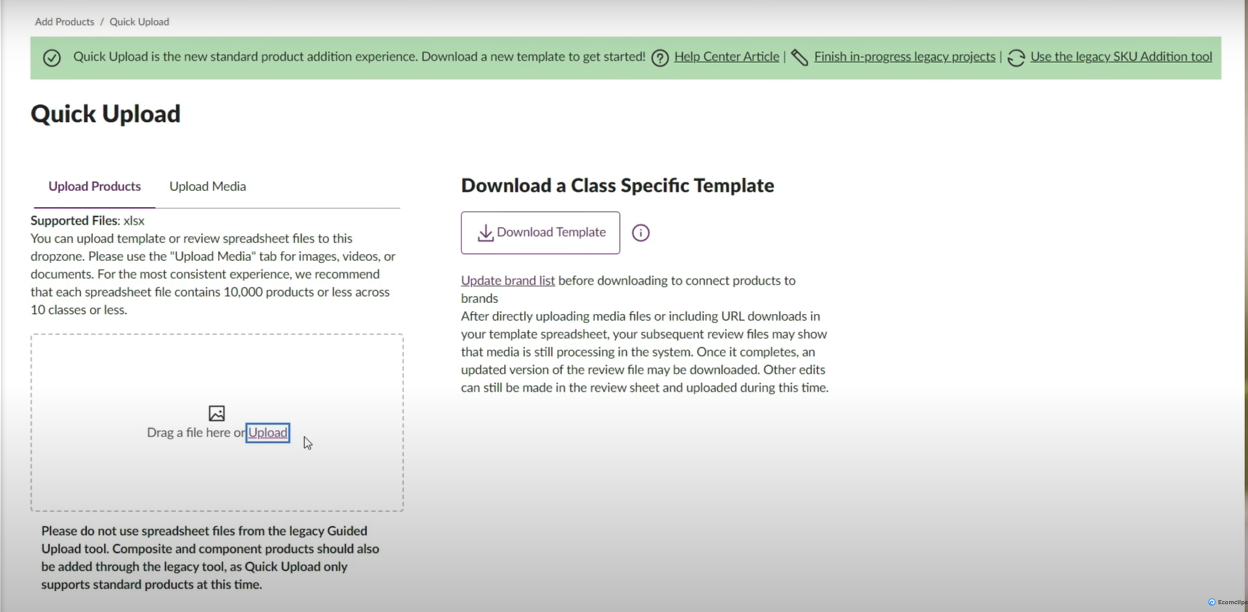
Choose Quick Upload
You’ll encounter two options: Quick Upload and Guided Upload. Quick Upload is ideal for both large and small submission sizes, making it a suitable choice for most sellers.

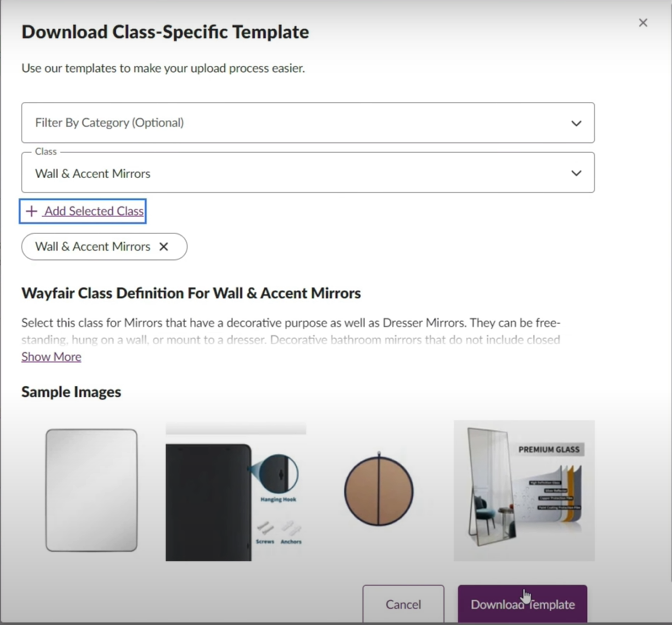
Download the Template
Click on the “Download Template” box. Here, you’ll need to select the Category and Class for your product. While Category is optional, Class is required to ensure your product appears in the appropriate Wayfair category.
After selecting the Category and Class, click on “Add Selected Class,” and then proceed to download the template.
Fill in Required Fields
Open the downloaded feed file, which consists of three types of fields: Required, Conditional, and Additional. Fill in all the Required fields with accurate data.
Upload the Feed File
Once you’ve completed all the necessary information in the feed file, return to the Quick Upload section. Here, you’ll find an upload box where you can simply drag and drop your file or use the upload button to select the file.
Review and Correct Errors
Check the “My Upload” section to see your upload history. Any errors will be highlighted in the error section. You can download the error file to identify and fix issues. Reupload the file once you’ve resolved the errors, and it’s error-free.
Submit for Review
Click on the “Submit” section. Wayfair will review your feed file, and soon, your products will be live on the Wayfair platform.
Conclusion
Congratulations! You’ve successfully listed your products on Wayfair. However, your journey doesn’t end here. Take a moment to review your listings, ensuring that images display correctly, prices are accurate, and all information is up-to-date. Listing via a feed file may seem overwhelming initially, but with our step-by-step guide, you’ll become a Wayfair pro in no time!
If you think this post has been helpful for you, please share this post with your friends and the e-commerce community. You can also check out our website www.ecomclips.com and get more updates! Keep browsing our blog to get more articles related to e-commerce. You can also mail us at info@ecomclips.com if you need any more help with Wayfair.